When managing computers in an organization, administrators often need to identify devices using their unique hardware information. One of the most commonly used identifiers is the BIOS serial number, which helps track devices for tasks such as inventory management, asset tracking, troubleshooting, or device registration.
However, many users are unsure how to quickly retrieve the BIOS serial number from Windows without manually checking the physical device or BIOS settings. This is where PowerShell becomes very helpful.
Using a simple PowerShell command, you can easily retrieve the BIOS serial number of a computer in seconds. This approach is especially useful for system administrators who manage multiple machines and want a quick way to collect hardware information.
In this tutorial, we will learn how to get the BIOS serial number using PowerShell step by step, along with a simple command you can run on any Windows computer.
Why Would You Even Need the BIOS Serial Number?
Before we jump into the commands, here’s why this matters:
- Warranty claims – Dell, HP, and Lenovo all use serial numbers to look up warranty status
- Asset management – Tracking computers in your organization
- Remote management – Getting serial numbers without physical access to machines
- Theft recovery – Serial numbers help identify stolen equipment
- Configuration management – Matching hardware to records in your database
The BIOS serial number is baked into the hardware. It doesn’t change when you reinstall Windows or swap hard drives. That’s what makes it so reliable.
Check out Get HP BIOS Settings Using PowerShell
The Simplest Method (Works 99% of the Time)
Open PowerShell and type this:
Get-WmiObject win32_bios | Select-Object SerialNumberHit Enter. Done.
You’ll see something like:
SerialNumber
------------
ABC12345XYZ
You can see the exact output in the screenshot below:
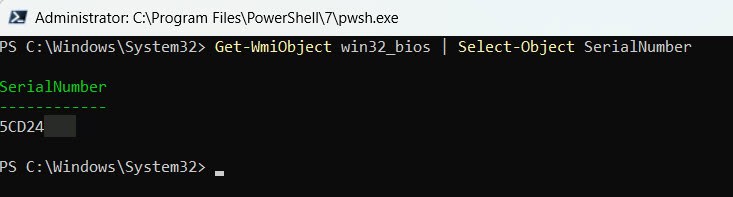
That’s your BIOS serial number. Simple, right?
What’s Actually Happening Here
Let me break this down:
- Get-WmiObject – This cmdlet queries WMI (Windows Management Instrumentation), which is basically a database of information about your computer
- win32_bios – This tells PowerShell to look specifically at BIOS information
- Select-Object SerialNumber – This filters the results to show only the serial number field
WMI stores tons of information about your hardware. We’re just pulling out the specific piece we need.
Read Get HP BIOS Version Using PowerShell
The Modern Method (For Windows 10/11 and Server 2016+)
Microsoft introduced a newer way to do this with the Get-CimInstance cmdlet. It’s faster and more efficient:
Get-CimInstance -ClassName Win32_BIOS | Select-Object SerialNumberThe output looks identical. The difference is under the hood – CIM uses newer protocols and performs better, especially over networks.
Here is the exact output in the screenshot below:
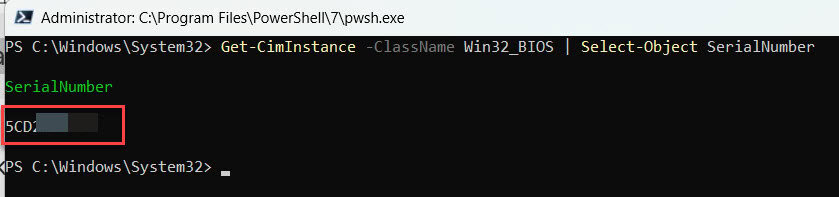
If you’re on Windows 10, Windows 11, or any recent Windows Server version, I’d recommend using this method instead.
Check out Get Free Disk Space Using PowerShell
Getting More Information (Not Just the Serial Number)
Sometimes you need more context. Here’s how to get additional BIOS details:
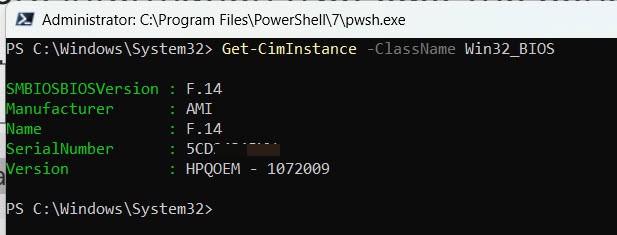
Get-CimInstance -ClassName Win32_BIOSThis dumps everything:
- Manufacturer – Who made the BIOS (usually the computer manufacturer)
- Name – BIOS version identifier
- SerialNumber – The serial number we’re after
- Version – BIOS version
- ReleaseDate – When this BIOS version was released
- SMBIOSBIOSVersion – Another version identifier
I executed the above PowerShell cmdlet and you can see the exact output in the screenshot below:
Pretty useful when you’re troubleshooting or documenting systems.
Formatting the Output Nicely
The default output can look cluttered. Make it cleaner with Format-List:
Get-CimInstance -ClassName Win32_BIOS | Format-List Manufacturer, SerialNumber, Version, ReleaseDateThis displays the information in a neat list format that’s easier to read.
Saving the Serial Number to a File
Need to keep a record? Export it to a text file:
Get-CimInstance -ClassName Win32_BIOS | Select-Object SerialNumber | Out-File C:\SerialNumber.txtThis creates a text file with the serial number. You can also export to CSV if you’re collecting data from multiple computers:
Get-CimInstance -ClassName Win32_BIOS | Select-Object SerialNumber | Export-Csv C:\SerialNumber.csv -NoTypeInformationThe CSV format is better when you’re building inventory lists.
Read Check if a Process is Running in PowerShell
Getting Serial Numbers from Multiple Remote Computers
Here’s where PowerShell really shines. You can query multiple computers at once:
$computers = "Computer1", "Computer2", "Computer3"
foreach ($computer in $computers) {
    Get-CimInstance -ClassName Win32_BIOS -ComputerName $computer | Select-Object PSComputerName, SerialNumber
}
This loops through each computer and retrieves the serial number. The PSComputerName property shows which computer each serial number belongs to.
Reading Computer Names from a File
If you have a long list of computers, put them in a text file (one computer name per line) and run:
$computers = Get-Content C:\computers.txt
foreach ($computer in $computers) {
    Get-CimInstance -ClassName Win32_BIOS -ComputerName $computer | Select-Object PSComputerName, SerialNumber
}
Way easier than typing them manually.
Exporting Remote Computer Data to CSV
Combine everything and export to CSV for a complete inventory:
$computers = Get-Content C:\computers.txt
$results = foreach ($computer in $computers) {
    Get-CimInstance -ClassName Win32_BIOS -ComputerName $computer | Select-Object PSComputerName, SerialNumber, Manufacturer
}
$results | Export-Csv C:\BIOSSerialNumbers.csv -NoTypeInformation
Now you have a spreadsheet with all your computer serial numbers. Perfect for asset management.
Handling Errors Gracefully
Sometimes computers are offline or you don’t have access. Add error handling:
$computers = Get-Content C:\computers.txt
$results = foreach ($computer in $computers) {
    try {
        Get-CimInstance -ClassName Win32_BIOS -ComputerName $computer -ErrorAction Stop | Select-Object PSComputerName, SerialNumber
    }
    catch {
        [PSCustomObject]@{
            PSComputerName = $computer
            SerialNumber = "ERROR: $($_.Exception.Message)"
        }
    }
}
$results | Export-Csv C:\BIOSSerialNumbers.csv -NoTypeInformation
This catches errors and logs them instead of stopping the entire script. You’ll see which computers failed and why.
Check out Why Does Windows PowerShell Keep Popping Up?
Getting the Serial Number Without PowerShell Cmdlets
If you’re on an older system or PowerShell isn’t working right, you can use WMIC from the command prompt:
wmic bios get serialnumberIt’s not as flexible as PowerShell, but it works in a pinch. WMIC is being phased out, though, so don’t rely on it for future scripts.
Common Issues and How to Fix Them
Problem: Serial number shows up blank or as “To Be Filled By O.E.M.”
Some manufacturers (especially on custom-built PCs or certain models) don’t populate this field. In that case, try getting the chassis serial number instead:
Get-CimInstance -ClassName Win32_SystemEnclosure | Select-Object SerialNumberProblem: “Access Denied” when querying remote computers
You need administrator rights on the remote computer. Make sure:
- You’re running PowerShell as administrator
- Your account has admin rights on the target computer
- Windows Remote Management (WinRM) is enabled on the target
Enable WinRM with:
Enable-PSRemoting -ForceProblem: “RPC Server is unavailable”
The remote computer might be offline, or the firewall is blocking WMI. Check if the computer is reachable:
Test-Connection -ComputerName Computer1 -Count 2If it responds but WMI still fails, check firewall rules for WMI traffic.
Read PowerShell Get-WindowsAutoPilotInfo
Quick Reference Commands
Here are all the key commands in one place:
Basic serial number:
Get-CimInstance -ClassName Win32_BIOS | Select-Object SerialNumberFull BIOS info:
Get-CimInstance -ClassName Win32_BIOS | Format-List *Remote computer:
Get-CimInstance -ClassName Win32_BIOS -ComputerName Computer1 | Select-Object SerialNumberExport to CSV:
Get-CimInstance -ClassName Win32_BIOS | Export-Csv C:\bios.csv -NoTypeInformationChassis serial (alternative):
Get-CimInstance -ClassName Win32_SystemEnclosure | Select-Object SerialNumberWrapping Up
In this tutorial, I explained how to retrieve the BIOS serial number using PowerShell and several methods.
The beauty of this approach is that it scales. Whether you need the serial number from one computer or a thousand, the process is the same. You’re just adding a loop and some error handling.
I use these commands all the time for inventory management and warranty lookups. It beats crawling under desks or asking users to flip their laptops over.
Save these commands somewhere handy. You’ll use them more often than you think.
You may also like the following tutorials:
- Check Who Modified a File Last in Windows Using PowerShell
- Delete User Profiles Using PowerShell in Windows 11
- Track User Login History on Windows Using PowerShell
Bijay Kumar is an esteemed author and the mind behind PowerShellFAQs.com, where he shares his extensive knowledge and expertise in PowerShell, with a particular focus on SharePoint projects. Recognized for his contributions to the tech community, Bijay has been honored with the prestigious Microsoft MVP award. With over 15 years of experience in the software industry, he has a rich professional background, having worked with industry giants such as HP and TCS. His insights and guidance have made him a respected figure in the world of software development and administration. Read more.
