If you manage HP computers, you’ve probably needed to check BIOS settings at some point. Maybe you’re troubleshooting a boot issue, verifying security settings, or just doing an audit across multiple machines.
The old way? Reboot the computer, mash F10 during startup, navigate through BIOS menus, and write things down. Not fun, especially when you’ve got dozens of machines to check.
The good news is that HP provides WMI classes that let you pull BIOS settings directly from Windows using PowerShell. No reboots needed. No manual note-taking. Just clean, exportable data.
Let me show you how to do this.
What You Need Before Starting
Before we dive in, here’s what you’ll need:
- An HP computer (this won’t work on Dell, Lenovo, or other brands)
- Windows PowerShell (already installed on Windows 7 and later)
- Administrator rights on the computer
- HP BIOS Configuration Utility (BCU) or native HP WMI support (most modern HP business machines have this built-in)
Most HP business-class computers from the last 10 years support WMI BIOS queries natively. Consumer models might be hit or miss.
The Quick Method: Getting All BIOS Settings
Let’s start with the simplest approach. Open PowerShell as Administrator (right-click the Start button and choose “Windows PowerShell (Admin)”).
Type this command:
Get-WmiObject -Namespace root/hp/instrumentedBIOS -Class HP_BIOSSettingHit Enter, and you’ll see a list of all available BIOS settings on your HP machine.
The output will look something like this:
Name                  : Asset Tracking Number
Value                 :
Path                  :
IsReadOnly            : 0
DisplayInUI           : 1
RequiresPhysicalPresence : 0
Each setting appears with its current value and metadata indicating whether it’s read-only or requires physical presence to change.
I executed the above cmdlet locally on my laptop, and you can see the exact output in the screenshot below:
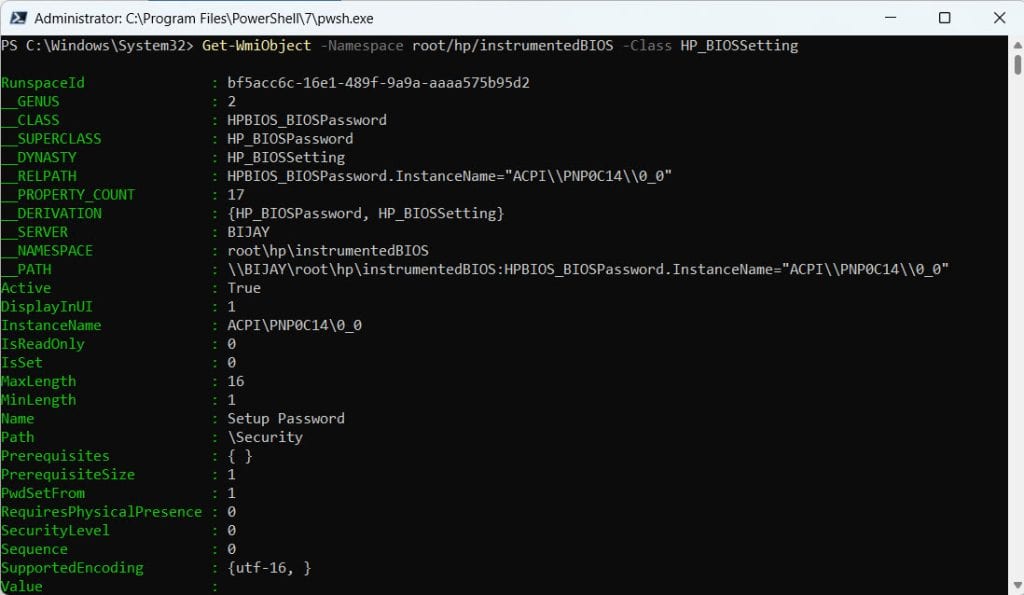
Understanding the Output
Let’s break down what you’re seeing:
- Name: The actual BIOS setting name (like “Virtualization Technology” or “Boot Order”)
- Value: The current value of that setting
- IsReadOnly: Whether you can change this setting (0 = changeable, 1 = read-only)
- DisplayInUI: Whether this shows up in the actual BIOS interface
- RequiresPhysicalPresence: Some security-sensitive settings require someone to physically press a key at the computer
The format isn’t the prettiest, but it’s complete. You’re seeing everything the BIOS exposes through WMI.
Check out Get HP BIOS Version Using PowerShell
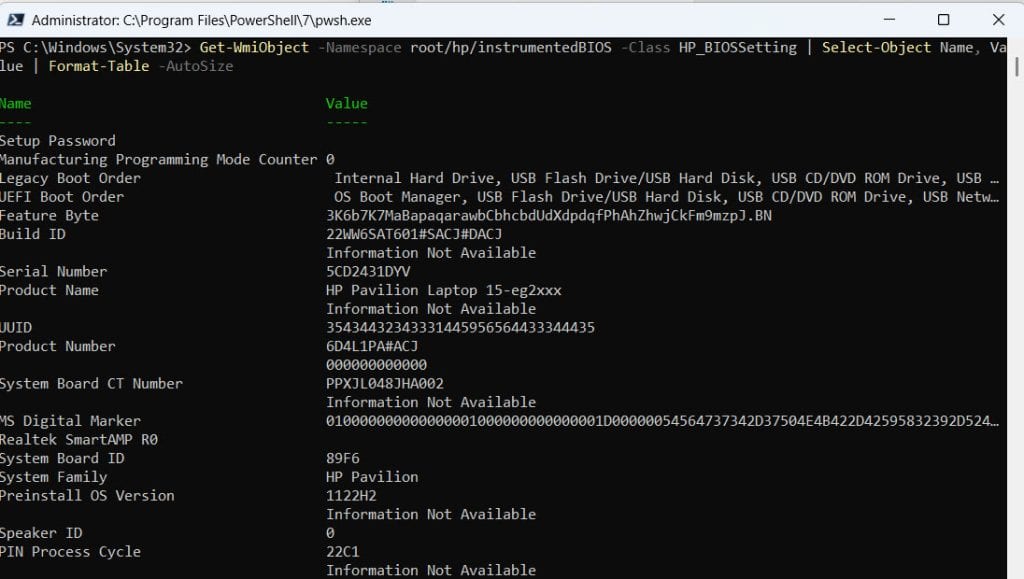
Making the Output More Readable
That raw output is functional but hard to read. Let’s clean it up:
Get-WmiObject -Namespace root/hp/instrumentedBIOS -Class HP_BIOSSetting |
    Select-Object Name, Value |
    Format-Table -AutoSize
This gives you a nice two-column table showing just the setting names and their values. Much easier to scan through.
You can see how it appears in the screenshot below:
If you want to sort it alphabetically:
Get-WmiObject -Namespace root/hp/instrumentedBIOS -Class HP_BIOSSetting |
    Select-Object Name, Value |
    Sort-Object Name |
    Format-Table -AutoSize
Finding Specific Settings
Looking for one particular setting? You don’t need to dump everything. Use filtering:
Get-WmiObject -Namespace root/hp/instrumentedBIOS -Class HP_BIOSSetting |
    Where-Object {$_.Name -like "*Virtualization*"}
This searches for any setting with “Virtualization” in the name. Replace that word with whatever you’re looking for.
Some common settings people search for:
- Virtualization Technology
- Secure Boot
- TPM Device
- Boot Order
- Wake on LAN
- USB Boot
- Legacy Support
The search is case-insensitive, so don’t worry about exact capitalization.
Read Get Free Disk Space Using PowerShell
Exporting BIOS Settings to a File
If you need to document current settings or compare configurations across machines, export to a CSV file:
Get-WmiObject -Namespace root/hp/instrumentedBIOS -Class HP_BIOSSetting |
    Select-Object Name, Value |
    Export-Csv -Path "C:\BIOSSettings.csv" -NoTypeInformation
This creates a CSV file you can open in Excel. Perfect for audits or before making changes (so you have a backup of original settings).
For a simple text file instead:
Get-WmiObject -Namespace root/hp/instrumentedBIOS -Class HP_BIOSSetting |
    Select-Object Name, Value |
    Out-File -FilePath "C:\BIOSSettings.txt"
Checking Multiple Remote Computers
Here’s where PowerShell really shines. You can check BIOS settings on remote computers without touching them.
For a single remote computer:
Get-WmiObject -Namespace root/hp/instrumentedBIOS -Class HP_BIOSSetting -ComputerName "PC-NAME" |
    Select-Object Name, Value |
    Format-Table -AutoSize
Replace “PC-NAME” with the actual computer name.
For multiple computers, create a text file with one computer name per line (let’s call it computers.txt), then run:
$computers = Get-Content "C:\computers.txt"

foreach ($computer in $computers) {
    Write-Host "Checking $computer..." -ForegroundColor Green
    Get-WmiObject -Namespace root/hp/instrumentedBIOS -Class HP_BIOSSetting -ComputerName $computer -ErrorAction SilentlyContinue |
        Select-Object Name, Value |
        Export-Csv -Path "C:\BIOS_$computer.csv" -NoTypeInformation
}
This creates a separate CSV for each computer. The ErrorAction parameter prevents the script from stopping if a computer is offline or unreachable.
Read PowerShell Get-WindowsAutoPilotInfo
What If It Doesn’t Work?
You might run into errors. Here are the common ones:
“Invalid namespace”
This means your HP computer doesn’t support the HP WMI interface. Older consumer models often don’t have it. You might need to install HP BIOS Configuration Utility (BCU), which is a separate download from HP’s website.
“Access denied”
You need to run PowerShell as Administrator. Close it and reopen with admin rights.
Nothing returns or empty results
Double-check the namespace spelling. Also verify you’re actually on an HP computer. This won’t work on other brands.
Error when querying remote computers
Make sure:
- You have admin rights on the remote computer
- Windows Firewall allows WMI traffic
- The remote computer is powered on and reachable on the network
Creating a Reusable Function
If you do this often, turn it into a function. Save this in your PowerShell profile or a script file:
function Get-HPBIOSSettings {
    param(
        [string]$ComputerName = $env:COMPUTERNAME,
        [string]$ExportPath
    )

    $settings = Get-WmiObject -Namespace root/hp/instrumentedBIOS -Class HP_BIOSSetting -ComputerName $ComputerName -ErrorAction Stop |
        Select-Object Name, Value

    if ($ExportPath) {
        $settings | Export-Csv -Path $ExportPath -NoTypeInformation
        Write-Host "Settings exported to $ExportPath" -ForegroundColor Green
    } else {
        $settings | Format-Table -AutoSize
    }
}
Now you can simply run:
Get-HPBIOSSettingsOr export to a file:
Get-HPBIOSSettings -ExportPath "C:\bios.csv"Or check a remote computer:
Get-HPBIOSSettings -ComputerName "PC-NAME" -ExportPath "C:\remote-bios.csv"Check out Why Does Windows PowerShell Keep Popping Up?
Practical Use Cases
Here’s when this comes in handy:
Pre-deployment audits: Check that new computers have the right BIOS settings before deploying them to users.
Security compliance: Verify that Secure Boot, TPM, and virtualization settings match your organization’s security policy.
Troubleshooting: Quickly check BIOS settings when investigating boot issues or hardware problems without rebooting.
Documentation: Keep records of BIOS configurations for your asset inventory.
Comparison: Export settings from a working computer and compare them with a problematic one to spot differences.
A Note About Changing Settings
This tutorial covers reading BIOS settings. Changing them through PowerShell is possible but requires more caution. You use the HP_BIOSSettingInterface class with the SetBIOSSetting method.
I’m not covering that here because:
- Wrong BIOS settings can prevent a computer from booting
- Some settings require BIOS passwords
- Changes usually need a reboot to take effect
- It’s easier to brick a system
If you need to change settings at scale, look into HP BIOS Configuration Utility (BCU) which has more safety checks built in.
Wrapping Up
Getting BIOS settings through PowerShell beats manual checking any day. It’s faster, you can do it remotely, and you can easily export and compare configurations.
The core command is straightforward:
Get-WmiObject -Namespace root/hp/instrumentedBIOS -Class HP_BIOSSettingEverything else just builds on that to make the output more useful or to check multiple machines.
Start with the basic command to see what your HP computer exposes. Then adapt the examples here to match what you actually need to do.
And remember: this only works on HP computers. Dell, Lenovo, and other manufacturers use different WMI namespaces and classes.
You may also like:
- Check Who Modified a File Last in Windows Using PowerShell
- Delete User Profiles Using PowerShell in Windows 11
- Set the Default Printer Using PowerShell in Windows
Bijay Kumar is an esteemed author and the mind behind PowerShellFAQs.com, where he shares his extensive knowledge and expertise in PowerShell, with a particular focus on SharePoint projects. Recognized for his contributions to the tech community, Bijay has been honored with the prestigious Microsoft MVP award. With over 15 years of experience in the software industry, he has a rich professional background, having worked with industry giants such as HP and TCS. His insights and guidance have made him a respected figure in the world of software development and administration. Read more.
