Let me show you how to check free disk space using PowerShell. This is something I do almost daily, and it’s way more useful than clicking through Windows Explorer when you need to monitor multiple drives or servers.
Here are the reasons why we use PowerShell to check disk space.
- You can check multiple drives at once
- Easy to check remote computers
- You can save the results to a file
- Great for scheduling automated checks
- Perfect when you need to track disk space over time
Now let’s get into the actual commands.
The Basic Command: Get-PSDrive
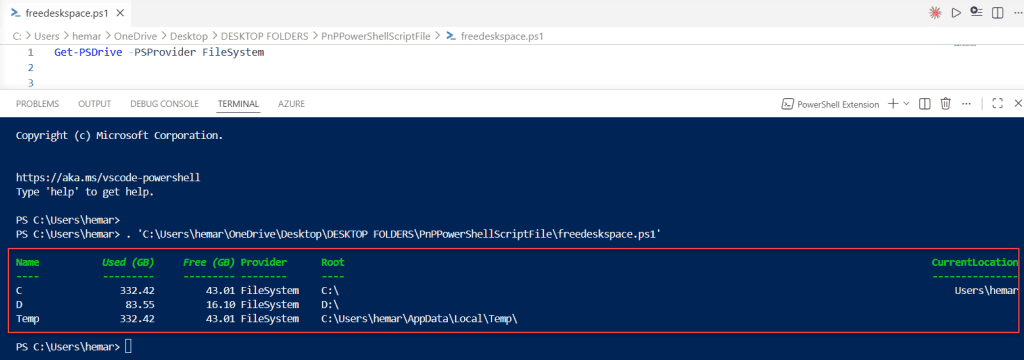
The simplest way to check disk space is using Get-PSDrive:
Get-PSDrive -PSProvider FileSystemThis shows all your drives with their used and free space. You’ll see something like this:
Name    Used (GB)     Free (GB)
----    ---------     ---------
C          156.23        743.77
D           45.89        454.11
You can see the exact output in the screenshot below:
It’s quick, it’s simple, and it works. But it’s pretty basic. Let me show you better options.
Check out PowerShell Ternary Operator
The Better Option: Get-Volume
If you’re on Windows 8 or later (and you probably are), use Get-Volume:
Get-VolumeThis command gives you more information about each drive, including the file system type and health status.
To see just your regular hard drives (not CD-ROMs or other stuff):
Get-Volume | Where-Object {$_.DriveType -eq 'Fixed'}I exectued the above PowerShell script, and you can see the exact output in the screenshot below:

Getting Free Disk Space in GB
Here’s where it gets practical. The default output sometimes shows bytes, which is hard to read. Let’s format it properly.
Using WMI (Works on All Windows Versions)
Get-WmiObject -Class Win32_LogicalDisk -Filter "DriveType=3" |
Select-Object DeviceID,
    @{Name="FreeSpace(GB)";Expression={[math]::Round($_.FreeSpace/1GB,2)}},
    @{Name="TotalSize(GB)";Expression={[math]::Round($_.Size/1GB,2)}}
Let me break this down:
Win32_LogicalDisk– This is the WMI class that stores disk informationDriveType=3– This filters for local hard drives only (3 = local disk)- The
@{Name=...Expression=...}part creates custom columns /1GBconverts bytes to gigabytes[math]::Round(...,2)rounds to 2 decimal places
Using CIM (Newer Method)
If you’re on PowerShell 3.0 or later, use CIM instead of WMI:
Get-CimInstance -ClassName Win32_LogicalDisk -Filter "DriveType=3" |
Select-Object DeviceID,
    @{Name="Free(GB)";Expression={[math]::Round($_.FreeSpace/1GB,2)}},
    @{Name="Total(GB)";Expression={[math]::Round($_.Size/1GB,2)}}
You can see the exact output in the screenshot below:
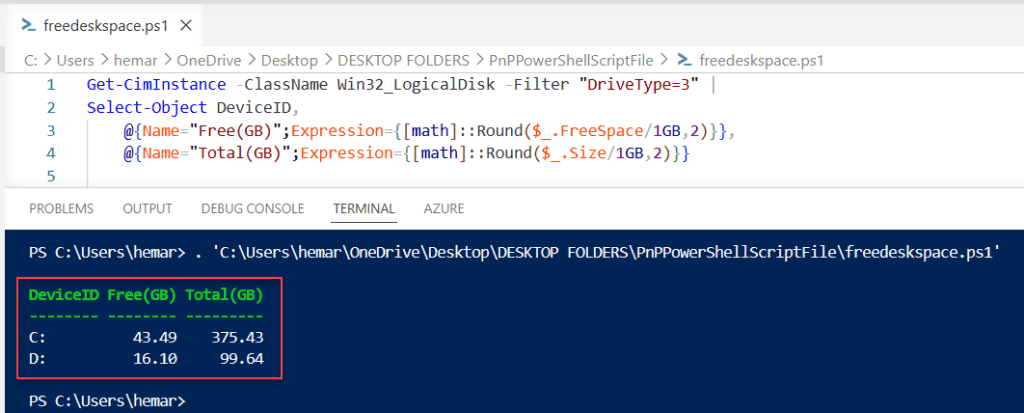
CIM is faster and works better with remote computers. It’s basically the modern version of WMI commands.
Check out How to Check if a Variable is Null in PowerShell?
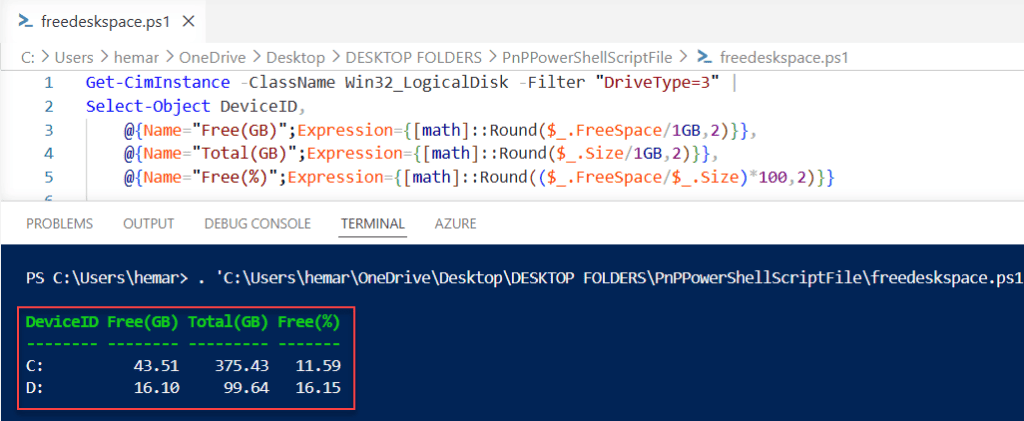
Getting Free Disk Space as a Percentage
This is really useful when you want to set up alerts or just quickly see which drives are getting full.
Get-CimInstance -ClassName Win32_LogicalDisk -Filter "DriveType=3" |
Select-Object DeviceID,
    @{Name="Free(GB)";Expression={[math]::Round($_.FreeSpace/1GB,2)}},
    @{Name="Total(GB)";Expression={[math]::Round($_.Size/1GB,2)}},
    @{Name="Free(%)";Expression={[math]::Round(($_.FreeSpace/$_.Size)*100,2)}}
The percentage calculation is simple: divide free space by total size, multiply by 100, and round it.
Color-Coding Based on Free Space
Want to make it even better? Let’s add some visual feedback:
Get-CimInstance -ClassName Win32_LogicalDisk -Filter "DriveType=3" | ForEach-Object {
    $percentFree = [math]::Round(($_.FreeSpace/$_.Size)*100,2)

    if ($percentFree -lt 10) {
        Write-Host "$($_.DeviceID) - $percentFree% free" -ForegroundColor Red
    }
    elseif ($percentFree -lt 20) {
        Write-Host "$($_.DeviceID) - $percentFree% free" -ForegroundColor Yellow
    }
    else {
        Write-Host "$($_.DeviceID) - $percentFree% free" -ForegroundColor Green
    }
}
This shows red for drives below 10% free, yellow for under 20%, and green for everything else.
Tracking Disk Space Over Time
Here’s where PowerShell really shines. You can log disk space automatically and track how it changes.
Creating a Simple Log
$date = Get-Date -Format "yyyy-MM-dd HH:mm:ss"
Get-CimInstance -ClassName Win32_LogicalDisk -Filter "DriveType=3" |
Select-Object @{Name="Date";Expression={$date}},
    DeviceID,
    @{Name="Free(GB)";Expression={[math]::Round($_.FreeSpace/1GB,2)}},
    @{Name="Total(GB)";Expression={[math]::Round($_.Size/1GB,2)}},
    @{Name="Free(%)";Expression={[math]::Round(($_.FreeSpace/$_.Size)*100,2)}} |
Export-Csv -Path "C:\Logs\DiskSpace.csv" -Append -NoTypeInformation
This adds a timestamp and saves the results to a CSV file. Run this daily (or hourly), and you’ll build a history of your disk space usage.
Setting Up Scheduled Monitoring
Save the above script as Check-DiskSpace.ps1, then create a scheduled task to run it:
$action = New-ScheduledTaskAction -Execute 'Powershell.exe' -Argument '-File "C:\Scripts\Check-DiskSpace.ps1"'
$trigger = New-ScheduledTaskTrigger -Daily -At 9am
Register-ScheduledTask -Action $action -Trigger $trigger -TaskName "Daily Disk Space Check" -Description "Logs disk space daily"
Now you’ll automatically log disk space every day at 9 AM.
Check out PowerShell Not Equal Operator
Checking Disk Space on Remote Computers
Need to check disk space on other computers? PowerShell makes this easy.
Get-CimInstance -ClassName Win32_LogicalDisk -Filter "DriveType=3" -ComputerName "ServerName" |
Select-Object SystemName, DeviceID,
    @{Name="Free(GB)";Expression={[math]::Round($_.FreeSpace/1GB,2)}},
    @{Name="Total(GB)";Expression={[math]::Round($_.Size/1GB,2)}}
Replace “ServerName” with the actual computer name.
Checking Multiple Servers at Once
You can also check the disk space for multiple servers once in PowerShell:
$servers = "Server1", "Server2", "Server3"

foreach ($server in $servers) {
    Get-CimInstance -ClassName Win32_LogicalDisk -Filter "DriveType=3" -ComputerName $server |
    Select-Object SystemName, DeviceID,
        @{Name="Free(GB)";Expression={[math]::Round($_.FreeSpace/1GB,2)}},
        @{Name="Total(GB)";Expression={[math]::Round($_.Size/1GB,2)}}
}
This loops through all servers and shows disk space for each one.
Create Alerts for Low Disk Space
Here’s a practical script that sends you an email when disk space gets low:
$threshold = 20  # Alert when free space is below 20%

$lowDisks = Get-CimInstance -ClassName Win32_LogicalDisk -Filter "DriveType=3" | Where-Object {
    (($_.FreeSpace/$_.Size)*100) -lt $threshold
}

if ($lowDisks) {
    $emailParams = @{
        From = "alerts@yourcompany.com"
        To = "admin@yourcompany.com"
        Subject = "Low Disk Space Alert"
        Body = "The following drives are low on space:`n`n" + ($lowDisks | Out-String)
        SmtpServer = "smtp.yourcompany.com"
    }
    Send-MailMessage @emailParams
}
You’ll need to adjust the email settings for your environment, but this gives you the basic idea.
Making It Pretty: Creating a Function
If you do this often, create a function you can reuse:
function Get-DiskSpace {
    param(
        [string]$ComputerName = $env:COMPUTERNAME,
        [switch]$ShowPercentage
    )

    $disks = Get-CimInstance -ClassName Win32_LogicalDisk -Filter "DriveType=3" -ComputerName $ComputerName

    $result = $disks | Select-Object SystemName, DeviceID,
        @{Name="Free(GB)";Expression={[math]::Round($_.FreeSpace/1GB,2)}},
        @{Name="Total(GB)";Expression={[math]::Round($_.Size/1GB,2)}}

    if ($ShowPercentage) {
        $result | Select-Object *, @{Name="Free(%)";Expression={[math]::Round(($_.FreeSpace/$_.Size)*100,2)}}
    } else {
        $result
    }
}
Now you can just type:
Get-DiskSpace
Get-DiskSpace -ComputerName "Server1"
Get-DiskSpace -ShowPercentage
Much cleaner, right?
Common Issues and Solutions
Below are some common issues and their solutions; I got these errors while working with this.
- “Access Denied” errors: You need admin rights to query disk information on remote computers.
- WMI not working: Try CIM instead. It’s more reliable.
- Slow on remote computers: Use
-CimSessioninstead of-ComputerNameif you’re checking multiple times. It’s faster because it reuses the connection. - Numbers look weird: Make sure you’re dividing by 1GB, not 1024MB. There’s a difference.
Conclusion
In this tutorial, I explained how to check disk space with PowerShell using different methods. You can start with the basic Get-Volume or Get-CimInstance commands, then build from there based on what you need.
The real power comes when you automate this stuff. Set up logging, create alerts, and monitor trends over time. Your future self will thank you when you can see that a drive has been slowly filling up rather than suddenly being full one day.
Do let me know in the comment below if you still have some questions.
Also, you may like:
- How to Join an Array of Strings in PowerShell (The Easy Way)
- How to Get All Properties of an Object in PowerShell
- How to Kill a Process If It Is Running in PowerShell?
Bijay Kumar is an esteemed author and the mind behind PowerShellFAQs.com, where he shares his extensive knowledge and expertise in PowerShell, with a particular focus on SharePoint projects. Recognized for his contributions to the tech community, Bijay has been honored with the prestigious Microsoft MVP award. With over 15 years of experience in the software industry, he has a rich professional background, having worked with industry giants such as HP and TCS. His insights and guidance have made him a respected figure in the world of software development and administration. Read more.
