If you’ve ever needed to check your computer’s BIOS version, manufacturer, or other firmware details, you know it usually means rebooting your computer and pressing a special key during startup. That’s annoying, especially when you’re in the middle of work.
Here’s the good news: PowerShell can grab all that BIOS information without restarting anything. In this tutorial, I’ll show you exactly how to get BIOS information using PowerShell using various methods.
Why Would You Need BIOS Information Anyway?
Before we jump into the commands, let’s talk about when this actually matters:
- Checking if you need a BIOS update – Some updates fix security issues or hardware compatibility problems
- Troubleshooting hardware issues – Tech support often asks for this info
- Computer inventory – If you manage multiple computers, you need to track this stuff
- Verifying UEFI vs Legacy BIOS – Important when installing operating systems or troubleshooting boot issues
- Documentation – When setting up new systems or keeping records
Alright, let’s get into it.
Get BIOS Information Using Get-WmiObject cmdlet
Open PowerShell. You don’t need to run it as Administrator for this – just regular PowerShell works fine.
Type this command:
Get-WmiObject -Class Win32_BIOSPress Enter, and you’ll see something like this:
SMBIOSBIOSVersion : F.23
Manufacturer      : HP
Name              : F.23
SerialNumber      : CND12345AB
Version           : HPQOEM - 1
You can also see the exact information in the screenshot below:
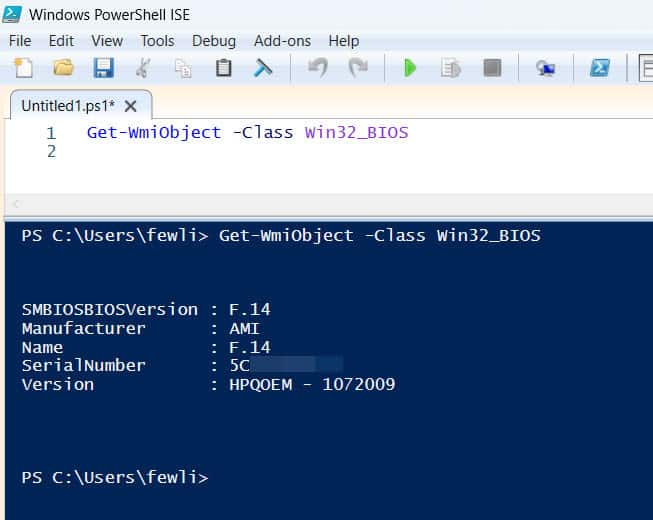
That’s it. You just pulled BIOS information without rebooting.
Check out Get HP BIOS Settings Using PowerShell
What Does All That Information Mean?
Let’s break down what you’re seeing:
- SMBIOSBIOSVersion – This is your BIOS version number. You’ll need this when checking for updates.
- Manufacturer – Who made your BIOS (usually the same as your computer manufacturer)
- Name – Another reference to the BIOS version
- SerialNumber – Your computer’s serial number (handy for warranty claims)
- Version – The BIOS version in a different format
The Modern Way (Using Get-CimInstance)
Microsoft recommends using Get-CimInstance instead of Get-WmiObject these days. It’s faster and works better with newer PowerShell versions.
Here’s the updated command:
Get-CimInstance -ClassName Win32_BIOSThe output looks identical, but this command runs faster and is more reliable on Windows 10 and Windows 11.
Here is the exact output in the screenshot below:
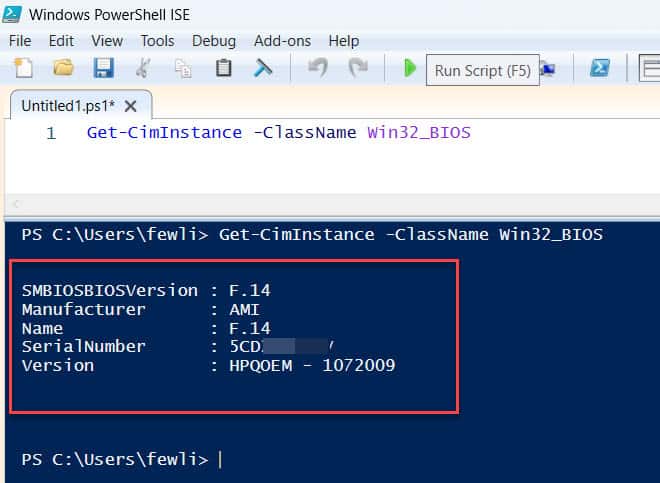
I use this one in my scripts now. It’s the way forward.
Read Get HP BIOS Version Using PowerShell
Get Just the Information You Need
Sometimes you don’t need everything – just one specific piece of information. Here’s how to filter the output.
Get Only the BIOS Version
(Get-CimInstance -ClassName Win32_BIOS).SMBIOSBIOSVersionThis gives you just the version number. Clean and simple.
Get the Manufacturer
(Get-CimInstance -ClassName Win32_BIOS).ManufacturerGet the Serial Number
(Get-CimInstance -ClassName Win32_BIOS).SerialNumberThis is really useful when you need to register products or check warranty status.
Make the Output Look Better
The default output works, but it’s not pretty. Let’s format it better.
Using Format-List
Get-CimInstance -ClassName Win32_BIOS | Format-List *This shows ALL properties in a nice list format. You’ll see stuff you didn’t even know was there:
- BIOSVersion – Array of BIOS versions
- BuildNumber – Build information
- Caption – Description of the BIOS
- CurrentLanguage – BIOS language setting
- InstallDate – When the BIOS was installed (sometimes null)
- PrimaryBIOS – Whether this is the primary BIOS
- ReleaseDate – When this BIOS version was released
- Status – Current status (usually “OK”)
Using Format-Table
Get-CimInstance -ClassName Win32_BIOS | Format-Table -AutoSizeThis creates a neat table. The -AutoSize parameter makes the columns fit the content.
Selecting Specific Properties
If you want only certain fields displayed nicely:
Get-CimInstance -ClassName Win32_BIOS | Select-Object Manufacturer, SMBIOSBIOSVersion, SerialNumber, ReleaseDateThis shows just the information you picked, in a clean format.
Check out Update PowerShell on Windows 11
Check UEFI or Legacy BIOS
This is a common question: Is my system using UEFI or old-school Legacy BIOS?
Here’s how to check:
$env:firmware_typeIf this returns nothing, try this instead:
Get-CimInstance -ClassName Win32_BIOS | Select-Object -ExpandProperty Manufacturer, SMBIOSBIOSVersionActually, the better way is:
if (Test-Path "$env:SystemDrive\EFI") { "UEFI" } else { "Legacy BIOS" }But the most reliable method is:
$bootMode = (Get-CimInstance -ClassName Win32_ComputerSystem).BootupState
if ($bootMode -match "UEFI") { "UEFI" } else { "Legacy BIOS or Unable to Determine" }
Actually, scratch all that. Here’s the command that actually works consistently:
try {
    Get-SecureBootUEFI -Name SetupMode
    Write-Host "UEFI"
} catch {
    Write-Host "Legacy BIOS"
}
If it returns information, you’re running UEFI. If it errors out, you’re running Legacy BIOS.
Get BIOS Info from Remote Computers
If you manage multiple computers, you can check BIOS info remotely.
Get-CimInstance -ClassName Win32_BIOS -ComputerName "REMOTE-PC-NAME"Replace “REMOTE-PC-NAME” with the actual computer name.
For multiple computers:
$computers = "PC1", "PC2", "PC3"
foreach ($computer in $computers) {
    Get-CimInstance -ClassName Win32_BIOS -ComputerName $computer | Select-Object PSComputerName, Manufacturer, SMBIOSBIOSVersion
}
This loops through each computer and grabs the BIOS info.
Check out List Windows Features Using PowerShell
Export BIOS Information to a File
Need to save this information? Here’s how.
Export to CSV
Get-CimInstance -ClassName Win32_BIOS | Select-Object Manufacturer, SMBIOSBIOSVersion, SerialNumber, ReleaseDate | Export-Csv -Path "C:\BIOSInfo.csv" -NoTypeInformationThis creates a CSV file you can open in Excel.
Export to Text File
Get-CimInstance -ClassName Win32_BIOS | Out-File -FilePath "C:\BIOSInfo.txt"Simple text file output.
Export to HTML Report
Get-CimInstance -ClassName Win32_BIOS | ConvertTo-Html | Out-File -FilePath "C:\BIOSInfo.html"Opens nicely in a web browser.
Create a Reusable Script using a Function
Let’s put this together into a script you can save and run anytime.
Open Notepad and paste this:
# Get BIOS Information Script
Write-Host "Gathering BIOS Information..." -ForegroundColor Green

$biosInfo = Get-CimInstance -ClassName Win32_BIOS

Write-Host "`nBIOS Details:" -ForegroundColor Yellow
Write-Host "Manufacturer: $($biosInfo.Manufacturer)"
Write-Host "Version: $($biosInfo.SMBIOSBIOSVersion)"
Write-Host "Serial Number: $($biosInfo.SerialNumber)"
Write-Host "Release Date: $($biosInfo.ReleaseDate)"
Write-Host "Status: $($biosInfo.Status)"

# Check for UEFI
Write-Host "`nBoot Mode:" -ForegroundColor Yellow
try {
    Get-SecureBootUEFI -Name SetupMode | Out-Null
    Write-Host "UEFI Mode"
} catch {
    Write-Host "Legacy BIOS Mode"
}

Write-Host "`nDone!" -ForegroundColor Green
Save it as Get-BIOSInfo.ps1
To run it, open PowerShell, navigate to where you saved it, and type:
.\Get-BIOSInfo.ps1Read Install Windows Updates Using PowerShell
Common Issues and Solutions
“Access Denied” Errors
If you get access denied when checking remote computers, make sure:
- You have admin rights on the remote computer
- Windows Remote Management (WinRM) is enabled
- The remote computer’s firewall allows WMI traffic
No Information Returned
Sometimes the command returns nothing. Try:
- Running PowerShell as Administrator
- Using
Get-WmiObjectinstead ofGet-CimInstance - Checking if WMI service is running:
Get-Service Winmgmt
Release Date Shows as DateTime Object
The ReleaseDate might look weird (like “20230815000000.000000+000”). Convert it:
$biosInfo = Get-CimInstance -ClassName Win32_BIOS
[Management.ManagementDateTimeConverter]::ToDateTime($biosInfo.ReleaseDate)
Actually, with Get-CimInstance, this is usually automatic. If it’s not converting, the BIOS might not have a proper release date stored.
Practical Use Cases
Here are some real-world scenarios where I’ve used these commands:
Before updating drivers – I check the BIOS version to see if the manufacturer recommends a BIOS update first.
Computer inventory spreadsheets – Export BIOS info to CSV for all computers in the office.
Troubleshooting boot issues – Verify UEFI vs Legacy before trying to fix boot problems.
Warranty claims – Grab the serial number without flipping the laptop over or opening the case.
Wrapping Up
In this tutorial, I will explain how to get BIOS information using PowerShell using several methods. I recommend starting with Get-CimInstance -ClassName Win32_BIOS and build from there.
You don’t need to memorize everything. Bookmark this page or save the script somewhere handy. Next time you need BIOS info, you’ll have it in seconds without rebooting.
The key commands to remember:
Get-CimInstance -ClassName Win32_BIOS– Basic BIOS info- Add
| Format-List *– See all properties - Add
| Select-Object– Pick specific properties - Export with
| Export-Csv– Save to file
That’s it. Now you’re equipped to handle BIOS information like a pro, without the hassle of entering BIOS setup during boot.
You may also like the following tutorial:
- Check for Windows Updates Using PowerShell
- Get Windows Update History Using PowerShell
- Install RSAT in Windows 11 Using PowerShell
Bijay Kumar is an esteemed author and the mind behind PowerShellFAQs.com, where he shares his extensive knowledge and expertise in PowerShell, with a particular focus on SharePoint projects. Recognized for his contributions to the tech community, Bijay has been honored with the prestigious Microsoft MVP award. With over 15 years of experience in the software industry, he has a rich professional background, having worked with industry giants such as HP and TCS. His insights and guidance have made him a respected figure in the world of software development and administration. Read more.
