If you’ve ever run a PowerShell command and stared at a wall of text scrolling past in the console, you already know the pain. It’s hard to read, hard to sort, and nearly impossible to pick out what you actually need. That’s exactly where Out-GridView comes in — and once you start using it, you’ll wonder how you lived without it.
In this tutorial, I’m going to walk you through everything you need to know about Out-GridView in PowerShell: what it does, how to use it, all its parameters, and some genuinely practical examples you can use right away.
What Is Out-GridView in PowerShell?
Out-GridView is a built-in PowerShell cmdlet that takes the output of a command and sends it to a separate, interactive graphical window — instead of dumping it all into the console. Think of it like opening a mini spreadsheet inside PowerShell.
The window it opens lets you:
- Sort data by clicking column headers
- Filter data using a built-in search/filter bar
- Select individual or multiple rows and pass them back into your script
It’s especially useful when you’re dealing with a large dataset, and you want to visually browse through it without writing a ton of extra filter code.
Note:
Out-GridViewis a Windows-only feature because it relies on .NET’s Windows Forms DataGridView control. It won’t work on Linux or macOS. If you’re on PowerShell 7 on Linux/Mac, check outOut-ConsoleGridViewfrom theMicrosoft.PowerShell.ConsoleGuiToolsmodule as an alternative.
PowerShell Out-GridView Syntax
Here’s the full syntax of Out-GridView:
Out-GridView
   [-InputObject <PSObject>]
   [-Title <String>]
   [-PassThru]
   [-OutputMode <OutputModeOption>]
   [<CommonParameters>]
You’ll mostly use it at the end of a pipeline, like this:
Get-Process | Out-GridView
That one line opens a full interactive grid showing all your running processes. No extra code needed.
Check out ConvertTo-Json in PowerShell
Your First Out-GridView Command
Let’s start with the simplest possible example. Open PowerShell and run this:
Get-Process | Out-GridView
A window pops up showing all running processes — their names, IDs, CPU usage, memory, and more. You can click any column header to sort by that column. You can also type in the filter box at the top to narrow things down.
You can see the exact output in the screenshot below:
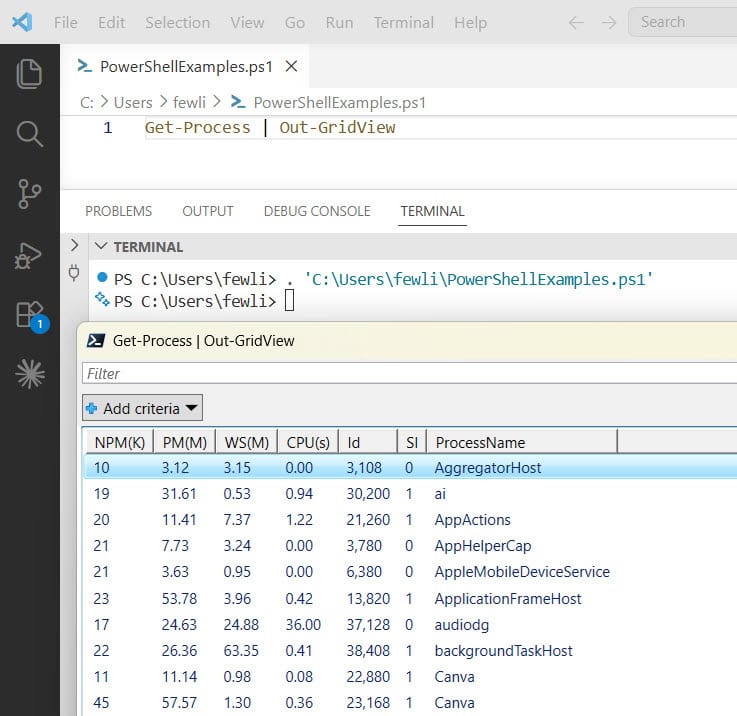
This is already 10x more useful than scrolling through the console.
The Parameters You Need to Know
-Title
By default, the grid view window is titled “Out-GridView.” That’s fine for quick lookups, but if you’re building something for other people (or you just like organized code), you can set a custom title:
Get-Service | Out-GridView -Title "Windows Services"
The -Title parameter just changes the text in the window’s title bar. Simple, but it makes things a lot cleaner — especially when you have multiple windows open.
-PassThru
This is where Out-GridView goes from being a display tool to being an actual input mechanism. The -PassThru parameter lets you select rows in the grid and pass them back into the pipeline.
Here’s how it works:
Get-Service | Out-GridView -Title "Pick a Service" -PassThru
When you run this, the grid opens, you click on one or more rows (hold Ctrl to select multiple), and then click OK. The selected items flow right back out of the command — so you can pipe them into something else.
A practical example: stop a service you pick from the grid:
Get-Service | Out-GridView -Title "Select Service to Stop" -PassThru | Stop-Service
That’s a real interactive GUI picker built entirely in PowerShell. No Windows Forms code, no extra modules — just Out-GridView.
-OutputMode
-OutputMode is similar to -PassThru but gives you tighter control over how many items the user can select. It has three values:
- None — the grid opens but nothing is returned (same as the default behavior without PassThru)
- Single — the user can only select one row
- Multiple — the user can select as many rows as they want
Single selection example:
$selectedService = Get-Service | Out-GridView -Title "Choose One Service" -OutputMode Single
Write-Output "You picked: $($selectedService.DisplayName)"
This is great when you need the user to make exactly one choice. The grid won’t let them select more than one row.
Multiple selection example:
$selectedServices = Get-Service | Where-Object { $_.StartType -eq 'Disabled' } | Out-GridView -Title "Select Disabled Services" -OutputMode Multiple
Write-Output "You selected:"
$selectedServices.Name
Here, the user can pick as many services as they want and those selections get stored in $selectedServices for further use.
PassThru vs OutputMode:
-PassThruis equivalent to-OutputMode Multiple. The only real difference is readability. Use-OutputMode Singlewhen you specifically need to restrict to one choice.
Read Get JSON Data from a URL in PowerShell
Filtering in the Grid View Window
One of the best features of Out-GridView is the built-in filter bar at the top of the window. You don’t have to use Where-Object in your PowerShell command to filter — you can let the user filter interactively in the grid.
When you type in the filter box, you can use these filter types:
- Contains — matches rows where the column value includes your text
- Does not contain — excludes rows with that value
- Starts with — matches rows where the column begins with your text
- Equals — exact match
- Does not equal — anything except an exact match
- Is empty / Is not empty — rows where the column is blank or not
You can stack multiple filters using the Add criteria button. So for example, you could filter services where Status equals “Running” AND StartType equals “Automatic” — all without writing a single line of code.
PowerShell Out-GridView Examples
Now, let you some examples of PowerShell Out-GridView.
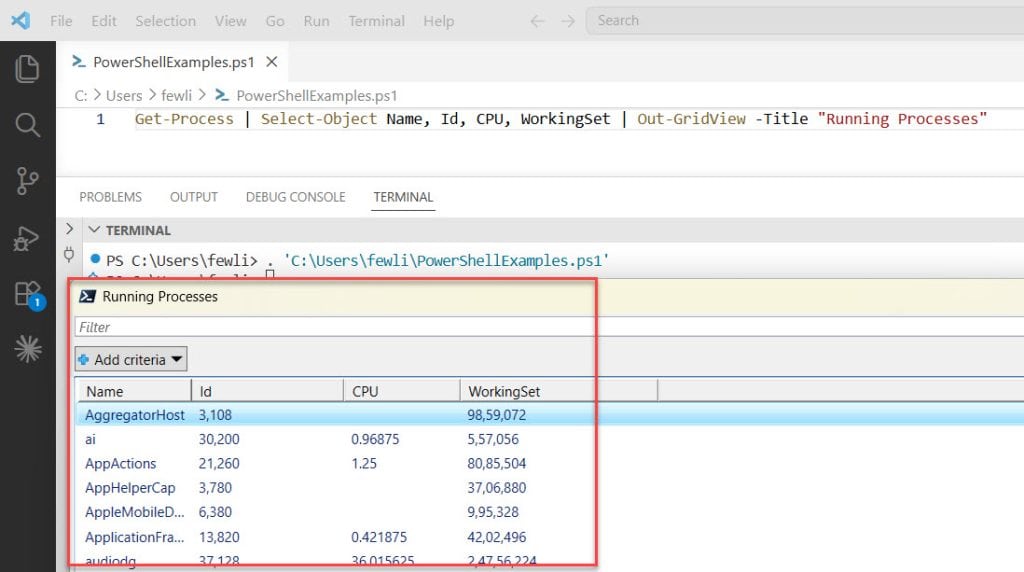
Example 1: Browse Running Processes
Get-Process | Select-Object Name, Id, CPU, WorkingSet | Out-GridView -Title "Running Processes"
I’ve added Select-Object here to limit the columns. By default, Get-Process returns a LOT of properties and the grid gets crowded. Picking the columns you care about makes it much easier to read.
You can see the exact output in the screenshot below:
In the same way, you can also view running services:
Get-Service | Where-Object { $_.Status -eq "Running" } | Out-GridView -Title "Running Services"This filters services to only show ones currently running, then throws them in the grid. Great for a quick health check on a machine.
Example 2: Interactive Service Manager
Get-Service | Where-Object { $_.StartType -eq 'Disabled' } |
    Out-GridView -Title "Disabled Services - Select to Enable" -PassThru |
    Set-Service -StartupType Manual
This is a practical admin script. It shows you all disabled services, lets you pick which ones you want to change, and immediately sets them to Manual start. The whole thing is about three lines.
Example 3: Pick Files to Delete
Get-ChildItem -Path "C:\Temp" |
    Out-GridView -Title "Select Files to Delete" -PassThru |
    Remove-Item -WhatIf
I’ve added -WhatIf at the end so it just shows you what would be deleted without actually doing it. Remove that flag when you’re ready to run it for real.
Example 4: Check Disk Usage
Get-PSDrive -PSProvider FileSystem |
    Select-Object Name, @{N="Used(GB)";E={[math]::Round($_.Used/1GB,2)}}, @{N="Free(GB)";E={[math]::Round($_.Free/1GB,2)}} |
    Out-GridView -Title "Disk Usage"
This one uses calculated properties to show disk usage in a readable GB format. The grid makes it easy to sort by free space and spot which drives are getting full.
Example 5: User Picker from Active Directory
If you’re working in an AD environment, this is a classic use case:
Get-ADUser -Filter * -Properties DisplayName, Department, Title |
    Select-Object DisplayName, SamAccountName, Department, Title |
    Out-GridView -Title "Select a User" -OutputMode Single
You get a searchable, sortable list of every user in AD. The manager picks the one they need and you’ve got the object ready to work with. Way better than asking them to type out a username.
Example 6: Export CSV After Selection
$selected = Get-EventLog -LogName System -Newest 500 |
    Select-Object TimeGenerated, EntryType, Source, Message |
    Out-GridView -Title "System Event Log - Select entries to export" -PassThru

$selected | Export-Csv -Path "C:\Temp\SelectedEvents.csv" -NoTypeInformation
Write-Output "Exported $($selected.Count) events to CSV."
This lets someone browse through event log entries, pick the ones that matter, and export just those to a CSV. Really handy for incident reporting.
Example 7: Filter Event Logs
Get-EventLog -LogName System -Newest 100 |
    Select-Object TimeGenerated, EntryType, Source, Message |
    Out-GridView -Title "Recent System Events"
Instead of paging through 100 event log entries in the console, you get a sortable, filterable table. You can instantly filter by EntryType to only see “Error” entries, for example.
Check out PowerShell Select-Object Value Only
Selecting Columns with Select-Object
By default, Out-GridView shows every property of the object you pipe into it. For complex objects like Get-ADUser or Get-Process, that can be 30+ columns. The grid becomes hard to navigate.
The fix is simple — pipe through Select-Object first:
Get-Process | Select-Object Name, Id, CPU, @{N="Memory(MB)"; E={[math]::Round($_.WorkingSet/1MB,2)}} | Out-GridViewI’m also using a calculated property here (@{N=...; E=...}) to convert the WorkingSet value from bytes to megabytes. The N is the column name, E is the expression that calculates the value.
Limitations to Know About
Out-GridView is great, but it does have a few things to keep in mind:
- Windows only. It won’t run on PowerShell 7+ on Linux or macOS. For cross-platform use, look at
Out-ConsoleGridView. - Not for pipelines that need to keep flowing. Once data goes into
Out-GridView(without-PassThru), it stops there. The pipeline ends. - Large datasets can be slow. If you’re piping 10,000+ rows into it, the window can take a few seconds to open. Filter before piping when possible.
- Display only shows first line of multi-line strings. If a property value spans multiple lines, the grid only shows the first line. Keep that in mind for things like event log messages.
Out-GridView vs Out-ConsoleGridView
If you’re on PowerShell 7 and need something cross-platform, Microsoft has a module called Microsoft.PowerShell.ConsoleGuiTools that gives you Out-ConsoleGridView. It works entirely inside the terminal — no separate window — and runs on Windows, Linux, and macOS.
Install it like this:
Install-Module -Name Microsoft.PowerShell.ConsoleGuiTools
Then use it:
Get-Process | Out-ConsoleGridView
The functionality is very similar to Out-GridView, but it renders in your terminal using a TUI (terminal UI) instead of a separate GUI window.
Using Out-GridView as a Menu
One of my favorite tricks is using Out-GridView as a simple menu in scripts. Instead of asking users to type in options, you give them a list to click from:
$options = @(
    [PSCustomObject]@{ Action = "View Running Services"; Value = "Running" }
    [PSCustomObject]@{ Action = "View Stopped Services"; Value = "Stopped" }
    [PSCustomObject]@{ Action = "View All Services"; Value = "" }
)

$choice = $options | Out-GridView -Title "What do you want to view?" -OutputMode Single

if ($choice.Value -ne "") {
    Get-Service | Where-Object { $_.Status -eq $choice.Value } | Out-GridView -Title "$($choice.Action)"
} else {
    Get-Service | Out-GridView -Title "All Services"
}
This creates a menu with three options. The user picks one, and the script reacts accordingly. It’s a lightweight way to add a GUI feel to your script without any Windows Forms knowledge.
Read PowerShell Select-Object Without Header
Using Out-GridView on PowerShell 7
Here’s something to watch out for: Out-GridView is not included in PowerShell 7 by default on all platforms. It was originally a Windows-only cmdlet tied to Windows Forms.
If you’re on PowerShell 7 on Windows, you can install the Microsoft.PowerShell.GraphicalTools module:
Install-Module Microsoft.PowerShell.GraphicalTools
This gives you Out-ConsoleGridView, which works similarly but runs in the terminal using a TUI (text-based UI). It supports multi-line strings better than the original Out-GridView too.
On Windows PowerShell 5.1 (the classic one that ships with Windows), Out-GridView works out of the box — no extra installation needed.
When Should You Use Out-GridView?
Out-GridView shines in specific situations:
- Quick data exploration — when you just want to see what a cmdlet returns without writing complex filters
- Interactive scripts — when you want a user (or yourself) to make selections from a list
- Ad-hoc auditing — checking services, processes, files, event logs on a machine
- Demos and training — showing someone PowerShell output in a more readable way
It’s probably not the right tool when you need:
- Automated, unattended scripts (since it needs a human to close the window)
- Linux/macOS compatibility without extra modules
- Complex formatting like color-coded rows (the standard
Out-GridViewdoesn’t support that)
Quick Reference: Out-GridView Parameters
| Parameter | What it does |
|---|---|
-Title | Sets the title bar text of the grid window |
-PassThru | Returns selected rows back to the pipeline |
-OutputMode None | Opens the grid but returns nothing (default) |
-OutputMode Single | Lets the user select exactly one row |
-OutputMode Multiple | Lets the user select multiple rows (same as PassThru) |
-InputObject | Accepts direct input (used when not piping) |
Tips for Getting the Most Out of Out-GridView
- Always use
Select-Objectfirst to keep the grid clean and focused - Set a meaningful
-Titleso the user (or future you) knows what the grid is showing - Use
-OutputMode Singlefor single-choice prompts — it’s cleaner than-PassThruwhen you only need one item - Filter with
Where-Objectbefore piping to keep large datasets manageable - Combine with
Export-Csvfor a quick “pick and export” workflow - Use it during script development to quickly inspect object properties without guessing at property names
Wrapping Up
I hope you got a sense of how to use the Out-GridView cmdlet in PowerShell through the real examples. From quick data browsing to full interactive pickers and lightweight GUIs, it’s a genuinely useful tool that fits into everyday scripting without any extra complexity.
Whether you’re an IT admin checking services, a developer inspecting objects, or a sysadmin building user-friendly scripts, Out-GridView deserves a permanent spot in your PowerShell toolkit.
You may also like the following tutorials:
- PowerShell: Where-Object vs Select-Object
- PowerShell Select-Object
- PowerShell Output to File and Console
Bijay Kumar is an esteemed author and the mind behind PowerShellFAQs.com, where he shares his extensive knowledge and expertise in PowerShell, with a particular focus on SharePoint projects. Recognized for his contributions to the tech community, Bijay has been honored with the prestigious Microsoft MVP award. With over 15 years of experience in the software industry, he has a rich professional background, having worked with industry giants such as HP and TCS. His insights and guidance have made him a respected figure in the world of software development and administration. Read more.
