
To convert XML to a table in PowerShell, cast the file to [xml], walk down to the repeating element with dot notation, and pipe those nodes to Format-Table. Each child element and attribute becomes a column:
$data = [xml](Get-Content .\employees.xml -Raw -Encoding UTF8)
$data.employees.employee | Format-Table -AutoSize
That covers flat files. Real XML has attributes, nested nodes and namespaces, so I’ll also show how to pick and rename columns, flatten child records, filter with XPath and export the table to CSV. I ran it all in PowerShell 7 and Windows PowerShell 5.1.
Show an XML file as a table with Format-Table
My sample file, employees.xml, lists three employees. Each one has two attributes (id and status) and five child elements:
<?xml version="1.0" encoding="utf-8"?>
<employees>
  <employee id="101" status="Active">
    <name>Maria Lopez</name>
    <department>Finance</department>
    <city>Austin</city>
    <salary>78500</salary>
    <hireDate>2026-01-12</hireDate>
  </employee>
  <employee id="102" status="Active">
    <name>Tom Baker</name>
    <department>IT</department>
    <city>Denver</city>
    <salary>92000</salary>
    <hireDate>2026-03-02</hireDate>
  </employee>
  <employee id="103" status="On leave">
    <name>Renée Walsh</name>
    <department>Sales</department>
    <city>Seattle</city>
    <salary>8800</salary>
    <hireDate>2026-05-18</hireDate>
  </employee>
</employees>
The [xml] cast turns the text into an XmlDocument object. From there, $data.employees.employee returns every employee node, and Format-Table with -AutoSize sizes each column to fit the data:
$data = [xml](Get-Content .\employees.xml -Raw -Encoding UTF8)
$data.employees.employee | Format-Table -AutoSize
Output:
id  status   name        department city    salary hireDate
--  ------   ----        ---------- ----    ------ --------
101 Active   Maria Lopez Finance    Austin  78500  2026-01-12
102 Active   Tom Baker   IT         Denver  92000  2026-03-02
103 On leave Renée Walsh Sales      Seattle 8800   2026-05-18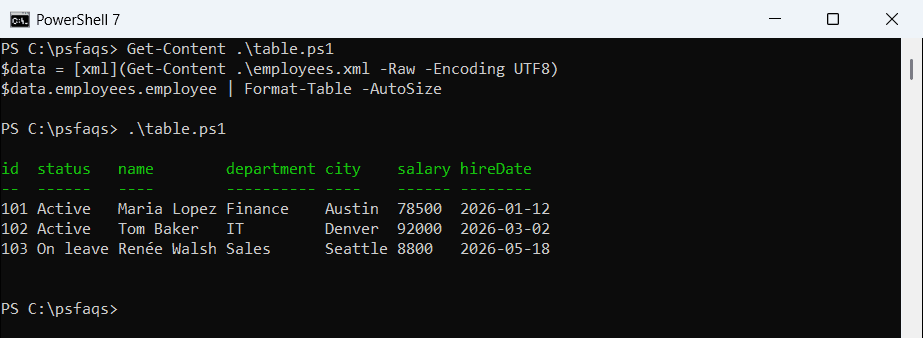
Attributes come first, then elements, in document order. I used Get-Content -Raw, which reads the file as one string and is faster than joining lines. The -Encoding UTF8 part matters in Windows PowerShell, as the next section shows.
Why does my XML show garbled characters in Windows PowerShell 5.1?
Windows PowerShell 5.1 reads a UTF-8 file without a byte order mark as ANSI. Most XML files are saved that way, so accented names break. Here are three ways to load the same file:
$plain = [xml](Get-Content .\employees.xml)
$utf8  = [xml](Get-Content .\employees.xml -Raw -Encoding UTF8)
$doc   = [xml]::new()
$doc.Load((Convert-Path .\employees.xml))

"Get-Content only:      $($plain.employees.employee[2].name)"
"Get-Content -Encoding: $($utf8.employees.employee[2].name)"
"XmlDocument.Load():    $($doc.employees.employee[2].name)"
Output:
Get-Content only:      Renée Walsh
Get-Content -Encoding: Renée Walsh
XmlDocument.Load():    Renée Walsh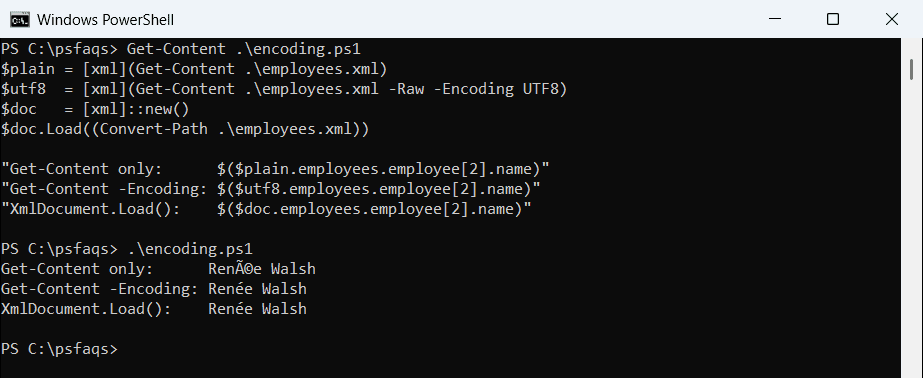
That’s the PowerShell 7 output, where all three lines read Renée Walsh. In Windows PowerShell 5.1, the first line turns into Renée Walsh, and your CSV inherits the damage.
XmlDocument.Load() is the safest choice because it honors the encoding declared inside the file. Give it a full path, since .NET methods resolve relative paths against the process folder, not your current location. If you hit other text problems, see converting UTF-16 files to UTF-8.
Pick, rename and type the columns with Select-Object
Everything in XML is text, so numbers and dates arrive as strings. Calculated properties in Select-Object rename each column and convert its value in one step:
$data = [xml](Get-Content .\employees.xml -Raw -Encoding UTF8)
$data.employees.employee |
    Select-Object @{n='ID'; e={[int]$_.id}}, @{n='Employee'; e={$_.name}}, city,
        @{n='Salary'; e={[int]$_.salary}}, @{n='Hired'; e={([datetime]$_.hireDate).ToString('MMM d, yyyy')}} |
    Sort-Object Salary -Descending |
    Format-Table -AutoSize
Output:
 ID Employee    city    Salary Hired
 -- --------    ----    ------ -----
102 Tom Baker   Denver   92000 Mar 2, 2026
101 Maria Lopez Austin   78500 Jan 12, 2026
103 Renée Walsh Seattle   8800 May 18, 2026
Because Salary is now an [int], Sort-Object puts 92000 first, and Hired is parsed as a date, then printed in a friendlier format. Without the casts, sorting gives a surprise:
$data = [xml](Get-Content .\employees.xml -Raw -Encoding UTF8)
$people = $data.employees.employee

"As text:   " + (($people | Sort-Object salary).salary -join ', ')
"As number: " + (($people | Sort-Object { [int]$_.salary }).salary -join ', ')
"Case:      " + $data.Employees.Employee.Count + ' nodes from $data.Employees.Employee'
Output:
As text:   78500, 8800, 92000
As number: 8800, 78500, 92000
Case:      3 nodes from $data.Employees.Employee
As text, “8800” sorts after “78500” because 8 comes after 7. Cast inside the Sort-Object script block when you only need the order. The last line shows that dot notation ignores case, so $data.Employees.Employee finds the same three nodes.
How do I read XML attributes and nested elements?
PowerShell exposes attributes and child elements the same way, as properties. Nested elements are objects, though, so Format-Table prints just the element name. Reach inside with a calculated property. Here’s orders.xml:
<?xml version="1.0" encoding="utf-8"?>
<orders>
  <order number="5001" date="2026-10-05">
    <customer>Dana Reyes</customer>
    <shipTo><city>Austin</city><state>TX</state></shipTo>
    <item sku="KB-210" qty="2" price="49.99"/>
    <item sku="MS-110" qty="1" price="24.50"/>
  </order>
  <order number="5002" date="2026-10-06">
    <customer>Tom Baker</customer>
    <shipTo><city>Denver</city><state>CO</state></shipTo>
    <item sku="MN-270" qty="1" price="219.00"/>
  </order>
</orders>