If you work in IT or manage Dell computers, you know how important service tags are. These unique identifiers help you track warranties, download drivers, and get support from Dell. But manually checking each machine? That’s a pain.
Good news: PowerShell makes this super easy.
In this tutorial, I’ll show you exactly how to grab Dell service tags using PowerShell. Whether you need to check one computer or hundreds across your network, you will find all information here.
What Exactly is a Dell Service Tag?
Before we jump into the code, let’s quickly cover what we’re actually looking for.
A Dell service tag is a unique 7-character alphanumeric code assigned to every Dell computer. It looks something like this: 1A2B3C4 or HXKMNQ2.
This tag is basically your computer’s fingerprint. Dell uses it to:
- Track your warranty status
- Provide specific drivers for your exact model
- Offer technical support
- Maintain service history
You’ll usually find it on a sticker somewhere on your Dell machine. But who wants to crawl under desks looking at stickers? That’s where PowerShell comes in.
Why Use PowerShell for This?
You might be wondering: “Why not just flip the laptop over and read the sticker?”
Fair question. Here’s why PowerShell is better:
- Speed: Check multiple computers in seconds
- Remote access: Get tags from machines across your network without touching them
- Documentation: Export all tags to a file for record-keeping
- Automation: Run scripts automatically to keep inventory updated
- No physical access needed: Perfect for remote workers or servers in locked rooms
Now let’s get into the actual methods.
Method 1: Using WMIC (The Classic Way)
This is the simplest method and works on most Windows systems.
Open PowerShell and type this:
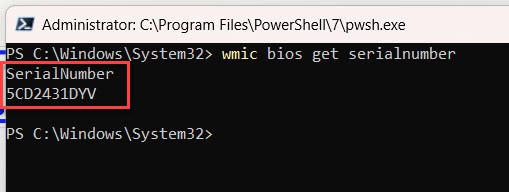
wmic bios get serialnumberHit Enter, and you’ll see something like this:
SerialNumber
HXKMNQ2
You can see the exact output in the screenshot below:
That’s it. Simple, right?
Why This Works
WMIC (Windows Management Instrumentation Command-line) queries your computer’s BIOS information. For Dell machines, the serial number stored in the BIOS is the service tag.
Making It Look Nicer
That output is a bit ugly with the extra header. Here’s a cleaner version:
(wmic bios get serialnumber)[2].Trim()This grabs just the service tag without the header or extra spaces.
Check out Get Windows Update History Using PowerShell
Method 2: Using Get-WmiObject (The PowerShell Way)
WMIC is getting deprecated in newer Windows versions, so here’s the more modern PowerShell approach:
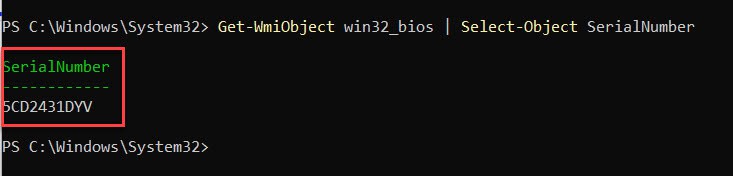
Get-WmiObject win32_bios | Select-Object SerialNumberThis gives you:
SerialNumber
------------
HXKMNQ2
Here is the exact output in the screenshot below:
Getting Just the Value
If you want only the service tag without any formatting:
(Get-WmiObject win32_bios).SerialNumberClean and simple.
Read Install RSAT in Windows 11 Using PowerShell
Method 3: Using Get-CimInstance (The Modern Way)
Microsoft recommends using Get-CimInstance instead of Get-WmiObject for newer systems. It’s faster and works better with remote computers.
Get-CimInstance -ClassName Win32_BIOS | Select-Object SerialNumberOr to get just the value:
(Get-CimInstance -ClassName Win32_BIOS).SerialNumberHonestly? For a single local computer, all three methods work fine. Use whichever you’re comfortable with.
Getting Service Tags from Remote Computers
Here’s where PowerShell really shines. You can grab service tags from other computers on your network without leaving your desk.
Single Remote Computer
Get-CimInstance -ClassName Win32_BIOS -ComputerName "PC-NAME" | Select-Object PSComputerName, SerialNumberReplace “PC-NAME” with the actual computer name.
This returns:
PSComputerName SerialNumber
-------------- ------------
PC-NAME        HXKMNQ2
Multiple Remote Computers
Got a bunch of computers? Put them in an array:
$computers = "PC-001", "PC-002", "PC-003"

foreach ($computer in $computers) {
    Get-CimInstance -ClassName Win32_BIOS -ComputerName $computer | Select-Object PSComputerName, SerialNumber
}
This loops through each computer and grabs the service tag.
Reading Computer Names from a File
For larger environments, keep computer names in a text file (one per line):
PC-001
PC-002
PC-003
PC-004
Then run:
$computers = Get-Content "C:\computers.txt"

foreach ($computer in $computers) {
    Get-CimInstance -ClassName Win32_BIOS -ComputerName $computer | Select-Object PSComputerName, SerialNumber
}
Check out How to Install Git on Windows Using PowerShell?
Exporting Results to CSV
Getting information on screen is nice, but you’ll probably want to save it for documentation.
Export to CSV File
$computers = Get-Content "C:\computers.txt"
$results = @()

foreach ($computer in $computers) {
    $bios = Get-CimInstance -ClassName Win32_BIOS -ComputerName $computer
    $results += [PSCustomObject]@{
        ComputerName = $computer
        ServiceTag = $bios.SerialNumber
    }
}

$results | Export-Csv -Path "C:\ServiceTags.csv" -NoTypeInformation
This creates a neat CSV file with computer names and their service tags. Perfect for opening in Excel.
Getting Additional Dell Information
While you’re at it, why not grab more useful info?
$bios = Get-CimInstance -ClassName Win32_BIOS
$computer = Get-CimInstance -ClassName Win32_ComputerSystem

[PSCustomObject]@{
    ComputerName = $computer.Name
    ServiceTag = $bios.SerialNumber
    Manufacturer = $bios.Manufacturer
    Model = $computer.Model
    BIOSVersion = $bios.SMBIOSBIOSVersion
}
This gives you a complete picture of the machine.
Creating a Reusable Function
If you do this regularly, make a function:
function Get-DellServiceTag {
    param(
        [string]$ComputerName = $env:COMPUTERNAME
    )

    try {
        $bios = Get-CimInstance -ClassName Win32_BIOS -ComputerName $ComputerName -ErrorAction Stop

        [PSCustomObject]@{
            ComputerName = $ComputerName
            ServiceTag = $bios.SerialNumber
            Status = "Success"
        }
    }
    catch {
        [PSCustomObject]@{
            ComputerName = $ComputerName
            ServiceTag = "N/A"
            Status = "Failed: $($_.Exception.Message)"
        }
    }
}
Now you can simply use:
Get-DellServiceTag
Get-DellServiceTag -ComputerName "PC-001"
The function includes error handling, so if a computer is offline or unreachable, it won’t crash your script.
Check out Restart a Windows Service Using PowerShell
Troubleshooting Common Issues
“Access Denied” Errors
You need admin rights to query remote computers. Make sure you’re running PowerShell as administrator and have appropriate network permissions.
Computer Not Responding
Check if:
- The computer is online:
Test-Connection -ComputerName "PC-NAME" -Count 1 - Firewall isn’t blocking WMI
- Remote management is enabled on the target machine
Non-Dell Computers
This method works for any manufacturer, but the serial number format will differ. Some manufacturers store different information in the BIOS serial number field.
Blank or Generic Serial Numbers
Virtual machines or clone images sometimes have generic or blank serial numbers. This happens when the BIOS info wasn’t properly set during imaging.
Checking Warranty Status with Service Tags
Once you have the service tags, you can check warranty info on Dell’s support site:
https://www.dell.com/support/home/en-us/product-support/servicetag/YOUR-TAG-HEREReplace YOUR-TAG-HERE with the actual service tag.
You can even automate opening these URLs:
$serviceTag = (Get-CimInstance -ClassName Win32_BIOS).SerialNumber
Start-Process "https://www.dell.com/support/home/en-us/product-support/servicetag/$serviceTag"
This grabs your service tag and opens the Dell support page automatically.
Wrapping Up
In this tutorial, I explained how to get Dell service tags with PowerShell. You have three main options:
- WMIC:
wmic bios get serialnumber(simple but old) - Get-WmiObject: More PowerShell-native
- Get-CimInstance: Modern and recommended
For remote computers, Get-CimInstance with the -ComputerName parameter is your best bet.
Start with the simple commands for single machines. Once you’re comfortable, build up to scripting multiple computers and exporting to CSV files.
If you still have any questions, leave a comment below, I will reply.
You may also like:
- Disable Windows Defender Using PowerShell
- Monitor and Manage CPU Usage using Windows PowerShell
- Install Snipping Tool in Windows 11 Using PowerShell
Bijay Kumar is an esteemed author and the mind behind PowerShellFAQs.com, where he shares his extensive knowledge and expertise in PowerShell, with a particular focus on SharePoint projects. Recognized for his contributions to the tech community, Bijay has been honored with the prestigious Microsoft MVP award. With over 15 years of experience in the software industry, he has a rich professional background, having worked with industry giants such as HP and TCS. His insights and guidance have made him a respected figure in the world of software development and administration. Read more.
