Managing files on Windows systems often involves organizing, archiving, or cleaning up folders based on file dates. For example, you might want to move files older than 30 days to an archive folder, separate last month’s reports, or relocate recently created files to another directory for processing.
This is where PowerShell becomes extremely helpful. PowerShell provides powerful file management capabilities that allow you to filter files based on properties like creation date, last modified date, or last accessed date, and then perform actions such as moving them to another folder.
In this tutorial, you will learn how to move files from one folder to another using PowerShell with date filtering. We will go through practical examples showing how to move files older than a certain number of days, move files created after a specific date, etc.
Why Use PowerShell Instead of Doing It Manually?
Before we jump in, you might be thinking: “Can’t I just drag and drop files?”
Sure, if you’ve got 10 files. But what if you need to:
- Move all files older than 30 days
- Move files created in January 2026
- Move only PDF files modified last week
- Do this same task every month
That’s where PowerShell becomes your best friend. You write the command once, and you can run it whenever you need it.
Move Files from One Folder to Another Using Move-Item
The core command you’ll use is Move-Item. It’s that simple.
Here’s the most basic version:
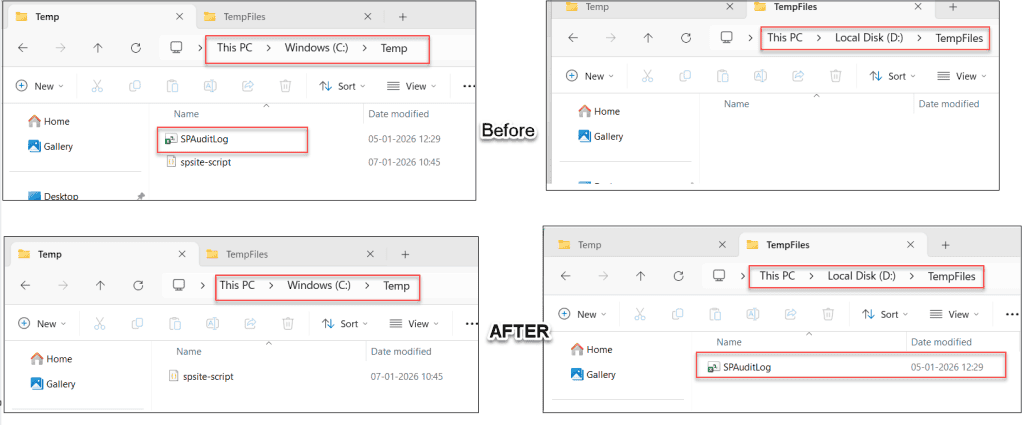
Move-Item -Path "C:\Source\file.txt" -Destination "C:\Destination\"This moves file.txt from the Source folder to the Destination folder. In the example below, I used two temp folders on the C and D drives to move files.
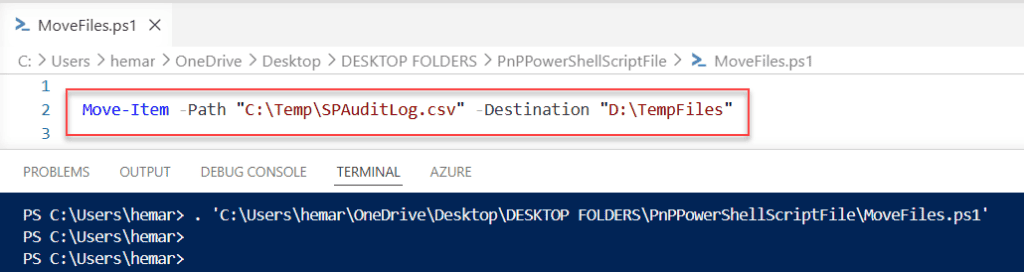
After running the PowerShell script, the file is moved from the source folder to the destination folder, as shown in the image below.
But we’re not here for basic stuff. Let’s get into the date-based moving.
Check out How to Find a Folder by Name in PowerShell?
Move Files Based on Creation Date
Let’s say you want to move all files created in the last 7 days.
Here’s how you do it using PowerShell:
$source = "C:\Source"
$destination = "C:\Destination"
$days = 7
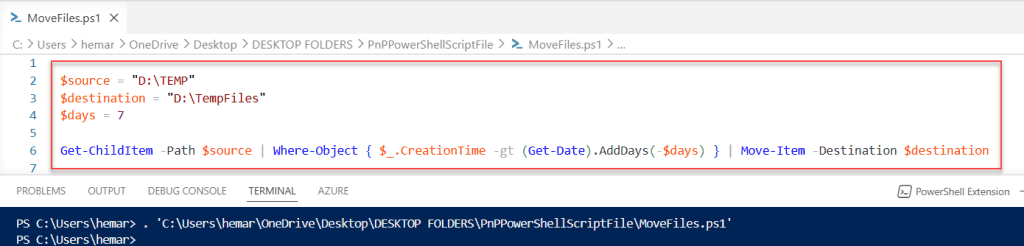
Get-ChildItem -Path $source | Where-Object { $_.CreationTime -gt (Get-Date).AddDays(-$days) } | Move-Item -Destination $destinationYou can see the exact output in the screenshot below:
Let me break this down:
$sourceand$destinationare variables. Think of them as nicknames for your folder paths. Makes things easier to read.Get-ChildItemlists all files in the source folderWhere-Objectfilters the files based on conditions$_.CreationTimerefers to when each file was created-gtmeans “greater than” (so newer than)(Get-Date).AddDays(-7)gives you the date from 7 days agoMove-Itemactually moves the files
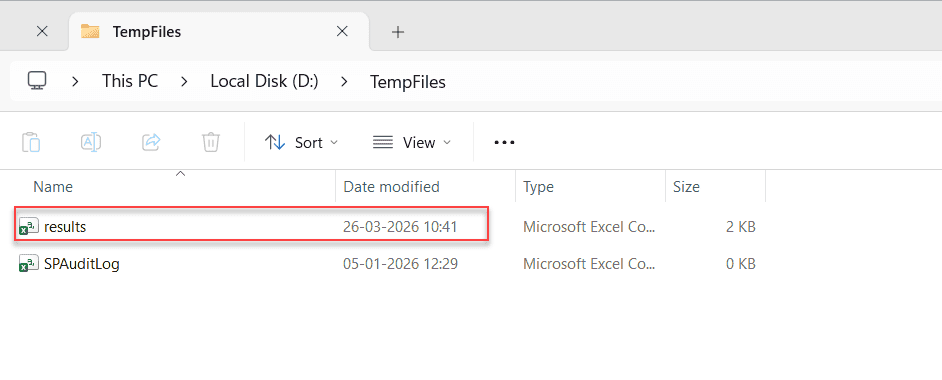
Below you can see the results file was created 7 days ago, now it has been moved into the destination folder I mentioned.
Read Check if a File’s LastWriteTime is Greater Than a Specific Date in PowerShell
Move Files Based on Modified Date
Sometimes you don’t care when a file was created. You care when it was last modified.
$source = "C:\Source"
$destination = "C:\Destination"
$days = 30

Get-ChildItem -Path $source | Where-Object { $_.LastWriteTime -lt (Get-Date).AddDays(-$days) } | Move-Item -Destination $destination
Notice I changed CreationTime to LastWriteTime and -gt to -lt (less than). This moves files that haven’t been modified in the last 30 days. Perfect for archiving old stuff.
Moving Files from a Specific Date Range
What if you want files from January 2026 only?
$source = "C:\Source"
$destination = "C:\Destination"
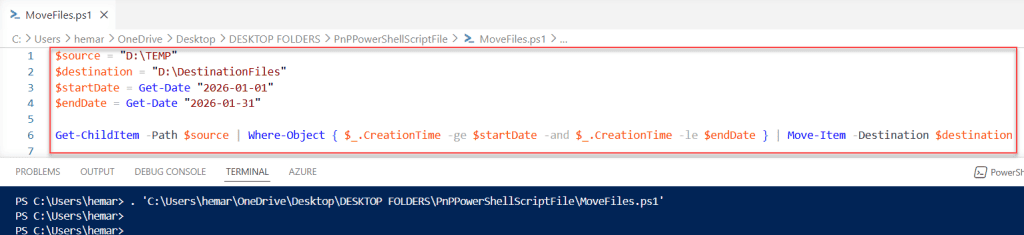
$startDate = Get-Date "2026-01-01"
$endDate = Get-Date "2026-01-31"
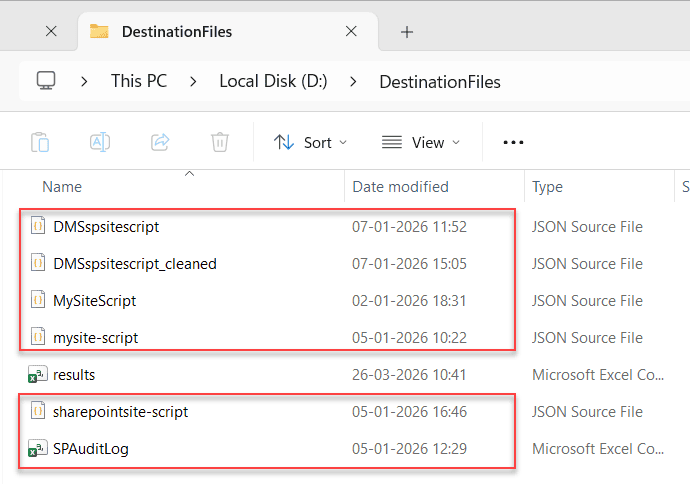
Get-ChildItem -Path $source | Where-Object { $_.CreationTime -ge $startDate -and $_.CreationTime -le $endDate } | Move-Item -Destination $destinationUpdate the $source and $destination variables with your folder location.
Here’s what changed:
- We defined
$startDateand$endDate - Used
-ge(greater than or equal to) and-le(less than or equal to) - Added
-andto combine both conditions
You can see the exact output in the screenshot below:
Check out Convert Excel Files to CSV Using PowerShell
Include Subfolders
By default, Get-ChildItem only looks at files in the main folder. If you want to include subfolders:
$source = "C:\Source"
$destination = "C:\Destination"
$days = 30

Get-ChildItem -Path $source -Recurse | Where-Object { $_.LastWriteTime -lt (Get-Date).AddDays(-$days) } | Move-Item -Destination $destination
Just add -Recurse after the path. That’s it.
Warning: This will move files from subfolders but won’t preserve the folder structure. All files end up directly in the destination folder. We’ll fix this in a bit.
Filter by File Type
Maybe you only want to move PDF files or Excel files.
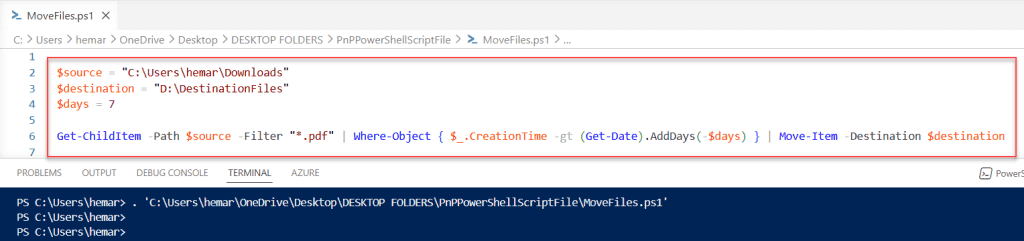
$source = "C:\Source"
$destination = "C:\Destination"
$days = 7
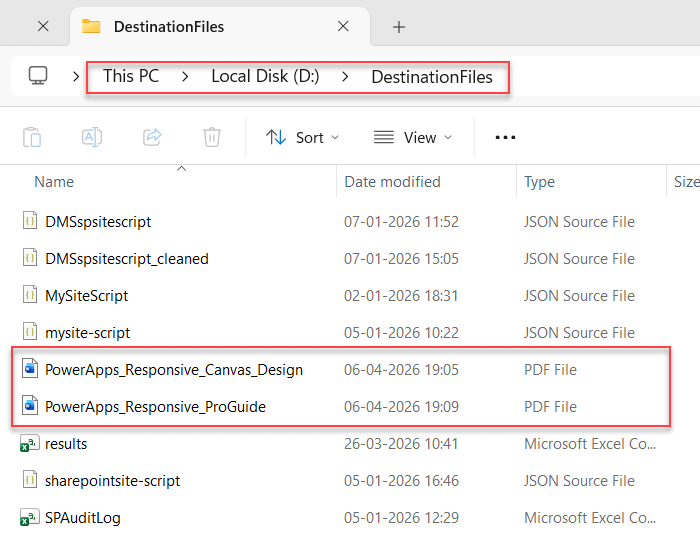
Get-ChildItem -Path $source -Filter "*.pdf" | Where-Object { $_.CreationTime -gt (Get-Date).AddDays(-$days) } | Move-Item -Destination $destinationHere is the cmd I executed using PowerShell ISE.
The -Filter "*.pdf" part does the magic. Replace “pdf” with whatever extension you need:
*.xlsxfor Excel files*.docxfor Word documents*.jpgfor images
You can see the exact output in the screenshot below:
Check out PowerShell Find File by Name Wildcard Examples
Preserve Folder Structure
Remember that problem with subfolders? Here’s how you keep the folder structure intact:
$source = "C:\Source"
$destination = "C:\Destination"
$days = 30

Get-ChildItem -Path $source -Recurse | Where-Object { $_.LastWriteTime -lt (Get-Date).AddDays(-$days) } | ForEach-Object {
    $destPath = Join-Path $destination $_.FullName.Substring($source.Length)
    $destDir = Split-Path $destPath
    if (!(Test-Path $destDir)) {
        New-Item -ItemType Directory -Path $destDir -Force
    }
    Move-Item $_.FullName -Destination $destPath
}
This is more complex, but here’s what it does:
- Calculates where each file should go in the destination
- Creates the necessary folders if they don’t exist
- Moves the file to the correct location
Testing Before You Move (Important!)
Here’s a pro tip: always test your command before actually moving files.
Replace Move-Item with Select-Object Name, CreationTime to just list the files that would be moved:
$source = "C:\Source"
$days = 30

Get-ChildItem -Path $source | Where-Object { $_.LastWriteTime -lt (Get-Date).AddDays(-$days) } | Select-Object Name, CreationTime
This shows you exactly which files match your criteria without moving anything. Once you’re happy with the results, swap back to Move-Item.
Read Find the Most Recent File in a Directory with PowerShell
Copy Instead of Move Files
Maybe you don’t want to move files. Maybe you want to copy them and keep the originals.
Just replace Move-Item with Copy-Item:
$source = "C:\Source"
$destination = "C:\Destination"
$days = 7
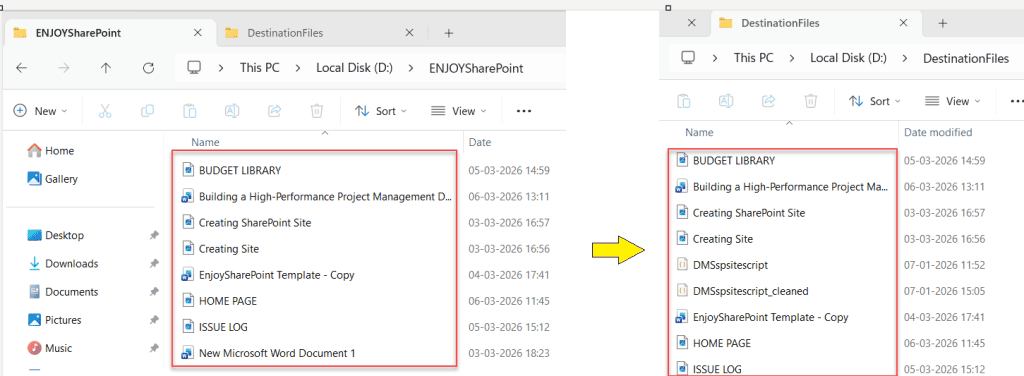
Get-ChildItem -Path $source | Where-Object { $_.CreationTime -gt (Get-Date).AddDays(-$days) } | Copy-Item -Destination $destination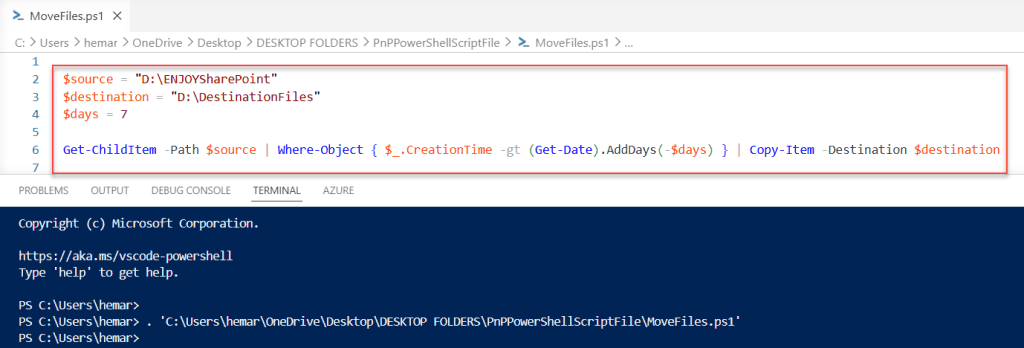
Same logic, different action.
You can see the exact output in the screenshot below:
Handling Errors
Sometimes files are in use, or you don’t have permission. Add error handling:
$source = "C:\Source"
$destination = "C:\Destination"
$days = 30

Get-ChildItem -Path $source | Where-Object { $_.LastWriteTime -lt (Get-Date).AddDays(-$days) } | ForEach-Object {
    try {
        Move-Item $_.FullName -Destination $destination -ErrorAction Stop
        Write-Host "Moved: $($_.Name)" -ForegroundColor Green
    }
    catch {
        Write-Host "Failed to move: $($_.Name) - $($_.Exception.Message)" -ForegroundColor Red
    }
}
This tries to move each file. If it works, you see a green message. If it fails, you see a red error message, but the script keeps going.
Check out Find Passwords in Files with PowerShell
Creating a Log File
For keeping track of what happened:
$source = "C:\Source"
$destination = "C:\Destination"
$days = 30
$logFile = "C:\Logs\MoveLog.txt"

Get-ChildItem -Path $source | Where-Object { $_.LastWriteTime -lt (Get-Date).AddDays(-$days) } | ForEach-Object {
    try {
        Move-Item $_.FullName -Destination $destination -ErrorAction Stop
        Add-Content -Path $logFile -Value "$(Get-Date) - Moved: $($_.Name)"
    }
    catch {
        Add-Content -Path $logFile -Value "$(Get-Date) - Failed: $($_.Name) - $($_.Exception.Message)"
    }
}
Now you have a permanent record in a text file.
Automating with Task Scheduler
Once you’ve got your script working, save it as a .ps1 file. Let’s call it MoveOldFiles.ps1.
To run it automatically:
- Open Task Scheduler
- Click “Create Basic Task”
- Give it a name like “Archive Old Files”
- Set your trigger (daily, weekly, etc.)
- Choose “Start a program”
- In “Program/script” type:
powershell.exe - In “Add arguments” type:
-ExecutionPolicy Bypass -File "C:\Scripts\MoveOldFiles.ps1"
Now it runs automatically without you lifting a finger.
Common Mistakes to Avoid
Here are some common mistakes you should avoid while moving files from one folder to another folder.
- Forgetting to create the destination folder: PowerShell won’t create it for you. Make sure it exists first.
- Using the wrong date property:
CreationTime,LastWriteTime, andLastAccessTimeare all different. Pick the right one for your needs. - Not testing first: I can’t stress this enough. Always do a test run with
Select-Objectbefore usingMove-Item. - Running as a regular user when you need admin rights: Some folders need administrator privileges. Right-click PowerShell and choose “Run as Administrator” if needed.
Real-World Example: Cleaning Up Downloads
Here’s a practical script I use myself:
$downloads = "$env:USERPROFILE\Downloads"
$archive = "$env:USERPROFILE\Documents\OldDownloads"
$days = 90

# Create archive folder if it doesn't exist
if (!(Test-Path $archive)) {
    New-Item -ItemType Directory -Path $archive
}

# Move files older than 90 days
Get-ChildItem -Path $downloads -File | Where-Object { $_.LastWriteTime -lt (Get-Date).AddDays(-$days) } | Move-Item -Destination $archive

Write-Host "Cleanup complete. Moved files older than $days days to $archive"
This keeps my Downloads folder clean by archiving anything older than 90 days.
Wrapping Up
Moving files based on dates in PowerShell isn’t rocket science. You just need:
Get-ChildItemto list filesWhere-Objectto filter by dateMove-Itemto actually move them
Start simple. Test your commands. Build up to more complex scenarios as you get comfortable.
The beauty of PowerShell is that you can save these commands and reuse them. Write it once, run it forever.
And if you mess up? Well, that’s what backups are for. Always have a backup before running scripts on important files.
You may also like the following tutorials:
Bijay Kumar is an esteemed author and the mind behind PowerShellFAQs.com, where he shares his extensive knowledge and expertise in PowerShell, with a particular focus on SharePoint projects. Recognized for his contributions to the tech community, Bijay has been honored with the prestigious Microsoft MVP award. With over 15 years of experience in the software industry, he has a rich professional background, having worked with industry giants such as HP and TCS. His insights and guidance have made him a respected figure in the world of software development and administration. Read more.
