When working with PowerShell scripts, you often need to see the output on the screen while also saving the results to a file. For example, imagine you are running a script to collect system information, event logs, or device details from multiple computers. While testing the script, you may want to view the output in the console while also storing the results in a text or log file for later review.
However, many users are unsure how to display the output in the console and write it to a file simultaneously. Beginners often use commands that only save the output to a file, which means nothing appears in the console window while the script runs.
This is where PowerShell offers a helpful approach that lets you send output to both the console and a file simultaneously.
In this tutorial, we will learn how to output PowerShell results to both the console and a file, along with practical examples that you can use in real scripts.
Using Tee-Object: The Most Elegant Solution
The best method for displaying output on screen while simultaneously saving it to a file is using PowerShell’s Tee-Object cmdlet. Named after the Unix/Linux “tee” command, this powerful tool splits your command output into two streams.
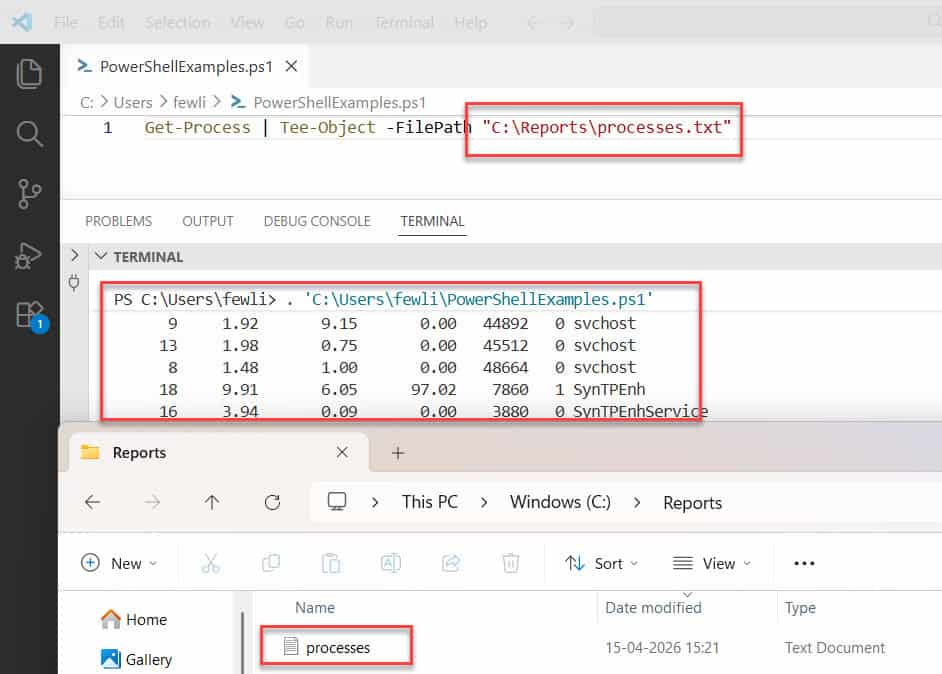
Get-Process | Tee-Object -FilePath "C:\Reports\processes.txt"After running this command, you’ll see all your system processes displayed on screen, and the exact same output will be saved to the specified file. This approach is perfect when you need to review results immediately while also maintaining a record for documentation or compliance purposes.
Tee-Object can be abbreviated to just tee to save typing time, making it even more efficient for daily use.
You can see the exact output in the screenshot below:
Check out Move Files from One Folder to Another Using PowerShell (With Date Filtering)
Redirecting Output with Redirection Operators
If you prefer a more concise syntax similar to traditional command-line interfaces, PowerShell’s redirection operators offer another powerful approach.
Get-Service | Tee-Object -FilePath "C:\Reports\services.txt"When executed, this command displays all Windows services on your console and also writes the complete output to the specified text file. What I love about this method is its simplicity and familiarity for those coming from cmd.exe or bash environments.
PowerShell actually offers several redirection operators like > and >> for file output, but these alone won’t display results on screen simultaneously.
Advanced Method: Using Out-File with Pipeline
For more control over output formatting and encoding, we can combine Out-File with careful pipeline management.
$results = Get-EventLog -LogName System -Newest 50
$results | Out-File -FilePath "C:\Reports\system_events.txt" -Encoding UTF8
$results
This three-line approach first stores the command results in a variable, then writes them to a file with specific encoding, and finally displays them on screen. I’ve used this technique countless times when generating reports that need special formatting or when working with international data that requires specific character encoding.
The Out-File cmdlet provides additional parameters like -Append and -Force that give you fine-grained control over how output is written.
Check out Check if a File’s LastWriteTime is Greater Than a Specific Date in PowerShell
Using a Custom Function for Convenience
After years of repeatedly typing these commands, I created a custom function to simplify the process. Here’s my personal function that I’ve used across numerous organizations:
function Write-ToFileAndConsole {
    param (
        [Parameter(ValueFromPipeline=$true, Mandatory=$true)]
        [object]$InputObject,

        [Parameter(Mandatory=$true)]
        [string]$FilePath,

        [switch]$Append,

        [string]$Encoding = "UTF8"
    )

    begin {
        $params = @{
            FilePath = $FilePath
            Encoding = $Encoding
        }

        if ($Append) {
            $params.Add("Append", $true)
        }
    }

    process {
        $InputObject | Tee-Object @params
    }
}
You can use this function like this:
Get-ChildItem -Path "C:\Program Files" -Recurse -ErrorAction SilentlyContinue |
    Where-Object { $_.Length -gt 100MB } |
    Write-ToFileAndConsole -FilePath "C:\Reports\large_files.txt" -Append
This advanced function makes your scripts more readable and maintainable, especially when you’re working with complex pipelines.
Read Convert Excel Files to CSV Using PowerShell
Handle Different Output Types
Console Formatting vs. File Output
One challenge I’ve encountered is that PowerShell’s display formatting doesn’t always match what gets written to files. This can create confusion when reviewing logs later.
Get-Process | Format-Table -Property Name, CPU, WorkingSet | Tee-Object -FilePath "C:\Reports\formatted_processes.txt"In this case, PowerShell’s formatting system affects both the console and file output. If you need raw data for later processing, place the Format-Table cmdlet after Tee-Object.
Working with XML and CSV Outputs
For structured data that you might need to import into other systems, PowerShell offers specialized export cmdlets that can be combined with console output:
$serverInventory = Get-WmiObject -Class Win32_OperatingSystem
$serverInventory | Export-Csv -Path "C:\Reports\servers.csv" -NoTypeInformation
$serverInventory
This approach is particularly useful when generating reports that need to be imported into Excel or other data analysis tools.
Managing Paged Output While Saving to File
When dealing with large outputs, the screen can quickly become overwhelmed. PowerShell’s Out-Host cmdlet with the -Paging parameter lets you view results one page at a time:
$largeOutput = Get-ChildItem -Path "C:\Windows" -Recurse -ErrorAction SilentlyContinue
$largeOutput | Tee-Object -FilePath "C:\Reports\windows_files.txt"
$largeOutput | Out-Host -Paging
This technique combines file output with paged console display, giving you the best of both worlds for large datasets.
Check out PowerShell Find File by Name Wildcard Examples
Best Practices for File Output
Based on my experience supporting enterprise environments, here are some best practices I recommend:
- Use consistent file naming schemes that include dates and descriptive information:
   $timestamp = Get-Date -Format "yyyyMMdd-HHmm"
Get-Service | Tee-Object -FilePath "C:\Reports\services_$timestamp.txt"- Create output directories if they don’t exist:
   $outputDir = "C:\Reports\$(Get-Date -Format 'yyyy-MM')"
   if (-not (Test-Path $outputDir)) {
       New-Item -Path $outputDir -ItemType Directory -Force
   }
Get-Process | Tee-Object -FilePath "$outputDir\processes.txt"- Add headers and footers to your output files for context:
   $header = "System Report for $env:COMPUTERNAME generated on $(Get-Date)`n`n"
   $footer = "`n`nReport completed successfully."

   $header | Out-File -FilePath "C:\Reports\system_report.txt"
   Get-ComputerInfo | Out-String | Tee-Object -FilePath "C:\Reports\system_report.txt" -Append
   $footer | Out-File -FilePath "C:\Reports\system_report.txt" -Append
Conclusion
In this tutorial, we learned how to output PowerShell results to both the console and a file. This approach is very useful when running scripts where you want to monitor the output in real time while also saving the results for future reference.
We also explored different methods that allow you to capture script output and store it in files such as text or log files, while still displaying the information in the PowerShell console. This technique is commonly used in system administration, troubleshooting, and automation scripts.
You may also like the following tutorials:
- Find the Most Recent File in a Directory with PowerShell
- Find Passwords in Files with PowerShell
- PowerShell Get-ChildItem Files Only
Bijay Kumar is an esteemed author and the mind behind PowerShellFAQs.com, where he shares his extensive knowledge and expertise in PowerShell, with a particular focus on SharePoint projects. Recognized for his contributions to the tech community, Bijay has been honored with the prestigious Microsoft MVP award. With over 15 years of experience in the software industry, he has a rich professional background, having worked with industry giants such as HP and TCS. His insights and guidance have made him a respected figure in the world of software development and administration. Read more.
