Are you working with CSV files in PowerShell, if yes, this tutorial might be helpful to you.
Today, I’m going to walk you through everything you need to know about using Import-CSV with foreach loops in PowerShell with some practical examples.
Here’s what you’ll learn:
- Why Import-CSV and foreach work so well together
- The basic syntax (it’s simpler than you think)
- Real-world examples you can actually use
- Common mistakes and how to avoid them
- Advanced tricks that’ll save you hours
Why Bother With Import-CSV and Foreach?
Think about it. How many times have you had a CSV file with hundreds or thousands of rows, and you needed to do something with each row? Maybe you needed to:
- Update user accounts from a list
- Send emails to everyone in a spreadsheet
- Check file sizes for multiple folders
- Create folders based on employee names
Doing this manually is very difficult. But with Import-CSV and foreach, you can automate the whole thing in minutes.
Check out Convert Excel Files to CSV Using PowerShell
How Import-CSV Works in PowerShell
Before we dive into foreach, let’s understand what Import-CSV actually does.
When you use Import-CSV, PowerShell reads your CSV file and converts each row into an object. The column headers become property names. It’s that simple.
Here’s a quick example. Say you have a file called employees.csv:
Name,Email,Department
John Smith,john@company.com,IT
Sarah Johnson,sarah@company.com,HR
Mike Chen,mike@company.com,Sales
When you run this command:
Import-CSV "C:\Bijay\employees.csv"PowerShell creates three objects, each with Name, Email, and Department properties. You can then work with these objects like any other PowerShell object.
Syntax
Here’s the simplest way to use Import-CSV with foreach:
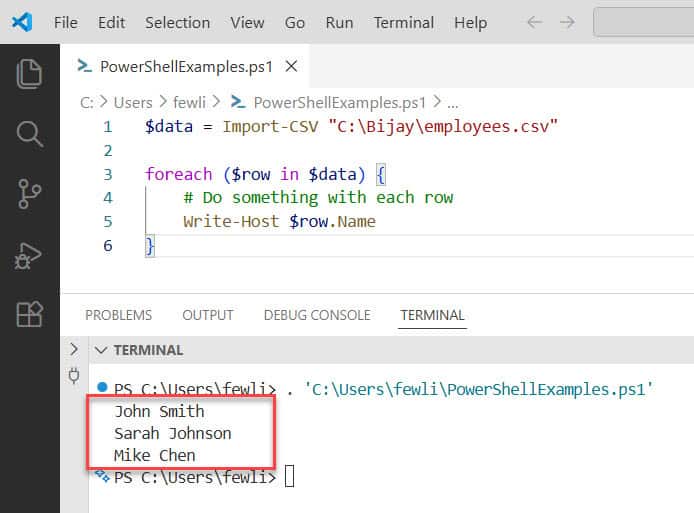
$data = Import-CSV "C:\Bijay\employees.csv"

foreach ($row in $data) {
    # Do something with each row
    Write-Host $row.Name
}
That’s it. Really. Let me break it down:
- Import-CSV reads the file and stores it in a variable (I usually call it
$dataor$csv) - The foreach loop goes through each row
- Inside the loop, you access columns using
$row.Name
You can see the exact output in the screenshot below:
Check out How to Convert TXT to CSV with PowerShell?
Real Example #1: Sending Welcome Emails
Let’s say you need to send welcome emails to new employees. You have a CSV file with their names and email addresses. You can use PowerShell to read all the employee email address, and send then a welcome email.
Here’s your CSV file (new_employees.csv):
FirstName,LastName,Email
Tom,Anderson,tom@company.com
Lisa,Martinez,lisa@company.com
And here’s your PowerShell script:
$employees = Import-CSV "C:\Bijay\new_employees.csv"

foreach ($employee in $employees) {
    $fullName = "$($employee.FirstName) $($employee.LastName)"

    Write-Host "Sending welcome email to $fullName at $($employee.Email)"

    # Your actual email sending code would go here
    # Send-MailMessage or whatever you use
}
See how readable that is? You can tell exactly what’s happening just by reading it.
Real Example #2: Creating Folders
Here’s another common scenario. You need to create project folders for multiple clients. Imagine you have a CSV file that contains the client name and the project code and you can to create folder for each clients.
Your CSV (clients.csv):
ClientName,ProjectCode
Acme Corp,AC2026
TechStart Inc,TS2026
Global Solutions,GS2026
Here is the PowerShell script.
$clients = Import-CSV "C:\Bijay\clients.csv"
$basePath = "C:\Projects"

foreach ($client in $clients) {
    $folderPath = Join-Path $basePath $client.ProjectCode

    if (Test-Path $folderPath) {
        Write-Host "Folder already exists: $folderPath" -ForegroundColor Yellow
    }
    else {
        New-Item -Path $folderPath -ItemType Directory
        Write-Host "Created folder: $folderPath" -ForegroundColor Green
    }
}
This script checks if each folder exists before creating it. Smart, right?
Check out Create Folder Structure from CSV using PowerShell
Access Columns
You access columns using dot notation: $row.ColumnName
But here’s something that tripped me up early on – the column name must match exactly what’s in your CSV header. If your CSV has “Email Address” (with a space), you need to use:
$row."Email Address"Notice the quotes around the column name. PowerShell needs those when the property name has spaces or special characters.
Real Example #3: Processing Files
Let’s get more practical. Say you have a list of file paths in a CSV, and you need to check their sizes.
Your CSV (files.csv):
FilePath
C:\Documents\Report1.pdf
C:\Documents\Report2.pdf
C:\Documents\Report3.pdf
Your script:
$files = Import-CSV "C:\files.csv"

foreach ($file in $files) {
    if (Test-Path $file.FilePath) {
        $item = Get-Item $file.FilePath
        $sizeInMB = [math]::Round($item.Length / 1MB, 2)

        Write-Host "$($file.FilePath) - Size: $sizeInMB MB"
    }
    else {
        Write-Host "$($file.FilePath) - File not found!" -ForegroundColor Red
    }
}
This checks if each file exists, calculates its size in megabytes, and displays the result. Super useful for auditing.
Using Where-Object to Filter
Sometimes you don’t want to process every row. You can filter your data before the foreach loop:
$employees = Import-CSV "C:\employees.csv"

# Only process IT department employees
$itEmployees = $employees | Where-Object { $_.Department -eq "IT" }

foreach ($employee in $itEmployees) {
    Write-Host "Processing IT employee: $($employee.Name)"
}
Or you can filter inside the loop with an if statement:
foreach ($employee in $employees) {
    if ($employee.Department -eq "IT") {
        Write-Host "Processing IT employee: $($employee.Name)"
    }
}
Both work. The first approach is cleaner when you have complex filters.
Check out Remove Blank Lines from CSV Files Using PowerShell
Common Mistakes (And How to Fix Them)
From my practical experience, let me show you a few mistakes and how to fix them.
Mistake #1: Wrong file path
# This will fail if the file isn't there
$data = Import-CSV "C:\wrongpath\file.csv"
Better approach:
$filePath = "C:\yourfile.csv"

if (Test-Path $filePath) {
    $data = Import-CSV $filePath
    foreach ($row in $data) {
        # Your code here
    }
}
else {
    Write-Host "File not found: $filePath" -ForegroundColor Red
}
Mistake #2: Misspelling column names
This will give you nothing (not even an error):
Write-Host $row.Emial # Oops, typoPowerShell just returns empty. Always double-check your column names.
Mistake #3: Not handling empty values
Sometimes CSV cells are empty. Check for them:
foreach ($row in $data) {
    if ([string]::IsNullOrWhiteSpace($row.Email)) {
        Write-Host "Skipping row with empty email"
        continue
    }

    # Process the row
}
Read Create CSV Files with Headers in PowerShell
Advanced Technique: Progress Bar
When processing large CSV files, add a progress bar so you know it’s working:
$data = Import-CSV "C:\largefile.csv"
$totalRows = $data.Count
$currentRow = 0

foreach ($row in $data) {
    $currentRow++
    $percentComplete = ($currentRow / $totalRows) * 100

    Write-Progress -Activity "Processing CSV" `
                   -Status "Row $currentRow of $totalRows" `
                   -PercentComplete $percentComplete

    # Your processing code here
    Start-Sleep -Milliseconds 100  # Just for demonstration
}

Write-Progress -Activity "Processing CSV" -Completed
This gives you a nice progress bar in PowerShell. Your future self will thank you.
Advanced Technique: Error Handling
Wrap your foreach loop in try-catch to handle errors gracefully:
$data = Import-CSV "C:\data.csv"

foreach ($row in $data) {
    try {
        # Your code that might fail
        # For example, creating an AD user
        Write-Host "Processing $($row.Name)"
    }
    catch {
        Write-Host "Error processing $($row.Name): $($_.Exception.Message)" -ForegroundColor Red

        # Log the error to a file
        Add-Content "C:\errors.log" "$($row.Name) - $($_.Exception.Message)"
    }
}
This way, one failed row doesn’t crash your entire script.
Exporting Results Back to CSV
After processing, you might want to save results to a new CSV:
$results = @()

$data = Import-CSV "C:\input.csv"

foreach ($row in $data) {
    $result = [PSCustomObject]@{
        Name = $row.Name
        Email = $row.Email
        Status = "Processed"
        ProcessedDate = Get-Date -Format "yyyy-MM-dd"
    }

    $results += $result
}

$results | Export-CSV "C:\output.csv" -NoTypeInformation
Now you have a record of what you processed and when.
Pipeline Alternative: ForEach-Object
Quick note – there’s another way to do this using the pipeline:
Import-CSV "C:\data.csv" | ForEach-Object {
    Write-Host $_.Name
}
This is more “PowerShell-style” but I find the regular foreach loop more readable, especially for complex operations. Use what makes sense to you.
Complete Real World PowerShell Script
Here’s a complete script that ties everything together. This script processes a list of users, creates AD accounts (simulated), and logs results:
# Configuration
$csvPath = "C:\Bijay\new_users.csv"
$logPath = "C:\Bijay\user_creation_log.csv"

# Check if file exists
if (-not (Test-Path $csvPath)) {
    Write-Host "CSV file not found!" -ForegroundColor Red
    exit
}

# Import data
$users = Import-CSV $csvPath
$results = @()

Write-Host "Starting user creation process..." -ForegroundColor Cyan
Write-Host "Total users to process: $($users.Count)`n"

# Process each user
foreach ($user in $users) {
    try {
        Write-Host "Processing: $($user.FirstName) $($user.LastName)"

        # Validate required fields
        if ([string]::IsNullOrWhiteSpace($user.Email)) {
            throw "Email address is empty"
        }

        # Your actual user creation code would go here
        # New-ADUser -Name "$($user.FirstName) $($user.LastName)" ...

        # Simulate processing time
        Start-Sleep -Milliseconds 500

        # Log success
        $result = [PSCustomObject]@{
            Name = "$($user.FirstName) $($user.LastName)"
            Email = $user.Email
            Status = "Success"
            Date = Get-Date -Format "yyyy-MM-dd HH:mm:ss"
            Error = ""
        }

        Write-Host "✓ Success" -ForegroundColor Green
    }
    catch {
        # Log error
        $result = [PSCustomObject]@{
            Name = "$($user.FirstName) $($user.LastName)"
            Email = $user.Email
            Status = "Failed"
            Date = Get-Date -Format "yyyy-MM-dd HH:mm:ss"
            Error = $_.Exception.Message
        }

        Write-Host "✗ Failed: $($_.Exception.Message)" -ForegroundColor Red
    }

    # Add to results array
    $results += $result
    Write-Host ""  # Blank line for readability
}

# Export results to log file
$results | Export-CSV $logPath -NoTypeInformation

# Summary
$successCount = ($results | Where-Object { $_.Status -eq "Success" }).Count
$failCount = ($results | Where-Object { $_.Status -eq "Failed" }).Count

Write-Host "======================================" -ForegroundColor Cyan
Write-Host "Processing Complete!" -ForegroundColor Cyan
Write-Host "======================================" -ForegroundColor Cyan
Write-Host "Total Processed: $($users.Count)"
Write-Host "Successful: $successCount" -ForegroundColor Green
Write-Host "Failed: $failCount" -ForegroundColor Red
Write-Host "`nLog saved to: $logPath"
This script is production-ready. It handles errors, validates data, logs everything, and gives you a nice summary at the end.
Performance Tips
When you’re working with large CSV files (thousands of rows), keep these tips in mind:
Tip #1: Pre-allocate arrays
Instead of using $results += $item which recreates the array each time, use an ArrayList:
$results = [System.Collections.ArrayList]::new()

foreach ($row in $data) {
    $result = [PSCustomObject]@{
        Name = $row.Name
        Status = "Processed"
    }

    [void]$results.Add($result)
}
This is way faster for large datasets.
Tip #2: Import only what you need
If your CSV has 20 columns but you only need 3, you can’t filter columns during import. But you can select them right after:
$data = Import-CSV "C:\bigfile.csv" | Select-Object Name, Email, DepartmentThis reduces memory usage.
Tip #3: Process in batches
For really huge files, process in chunks:
$batchSize = 100
$data = Import-CSV "C:\hugefile.csv"

for ($i = 0; $i -lt $data.Count; $i += $batchSize) {
    $batch = $data[$i..([Math]::Min($i + $batchSize - 1, $data.Count - 1))]

    foreach ($row in $batch) {
        # Process row
    }

    Write-Host "Processed batch: $($i + $batchSize) of $($data.Count)"
}
Read Convert CSV to HTML Table in PowerShell
Handling Different CSV Formats
Not all CSV files are created equal. Here are some common variations:
Semicolon-delimited files:
Import-CSV "C:\file.csv" -Delimiter ";"
Files without headers:
Import-CSV "C:\file.csv" -Header "Column1", "Column2", "Column3"
Different encoding:
Import-CSV "C:\file.csv" -Encoding UTF8
Debugging Your Script
When things don’t work, add some debug output:
$data = Import-CSV "C:\data.csv"

Write-Host "Total rows imported: $($data.Count)"
Write-Host "First row sample:"
$data[0] | Format-List

foreach ($row in $data) {
    Write-Host "Processing row..."
    $row | Format-List  # Shows all properties

    # Your code here
}
This helps you see exactly what data you’re working with.
Quick Reference: Most Common Patterns
Here are the patterns I use most often:
Basic loop:
Import-CSV "file.csv" | ForEach-Object {
    Write-Host $_.ColumnName
}
Loop with filtering:
$data = Import-CSV "file.csv"
foreach ($row in $data | Where-Object { $_.Status -eq "Active" }) {
    # Process only active items
}
Loop with counter:
$data = Import-CSV "file.csv"
$counter = 0
foreach ($row in $data) {
    $counter++
    Write-Host "Processing row $counter"
}
Loop with error logging:
$errors = @()
foreach ($row in $data) {
    try {
        # Your code
    }
    catch {
        $errors += [PSCustomObject]@{
            Item = $row.Name
            Error = $_.Exception.Message
        }
    }
}
$errors | Export-CSV "errors.csv" -NoTypeInformation
Check out Get the First and Last Line of a CSV File in PowerShell
Practical Exercise: Try This Yourself
Want to practice? Here’s a simple exercise:
- Create a CSV file called
websites.csv:
Website,Name
https://google.com,Google
https://microsoft.com,Microsoft
https://github.com,GitHub- Run this script:
$sites = Import-CSV "C:\websites.csv"

foreach ($site in $sites) {
    Write-Host "Testing $($site.Name)..." -NoNewline

    try {
        $response = Invoke-WebRequest -Uri $site.Website -UseBasicParsing -TimeoutSec 5
        Write-Host " ✓ Online (Status: $($response.StatusCode))" -ForegroundColor Green
    }
    catch {
        Write-Host " ✗ Failed" -ForegroundColor Red
    }
}
This script tests if websites are online. It’s simple but shows you the power of combining Import-CSV with foreach.
Common Use Cases
Here’s what people typically use Import-CSV and foreach for:
- User management: Creating, updating, or disabling user accounts in bulk
- File operations: Moving, copying, or renaming files based on a list
- Data validation: Checking if emails are formatted correctly, phone numbers are valid, etc.
- Report generation: Processing data and creating summary reports
- System administration: Checking disk space, services, or installed software across multiple servers
- Data migration: Moving data from one system to another
- Audit trails: Verifying that settings or configurations match expected values
Final Thoughts
In this tutorial, I have explained how to use foreach with PowerShell Import-CSV with a few examples.
Do let me know in the comment below if this helps to you.
You may also like:
- Export Table to CSV in PowerShell
- How to Convert JSON to CSV in PowerShell
- Get Unique Values from CSV Using PowerShell
Bijay Kumar is an esteemed author and the mind behind PowerShellFAQs.com, where he shares his extensive knowledge and expertise in PowerShell, with a particular focus on SharePoint projects. Recognized for his contributions to the tech community, Bijay has been honored with the prestigious Microsoft MVP award. With over 15 years of experience in the software industry, he has a rich professional background, having worked with industry giants such as HP and TCS. His insights and guidance have made him a respected figure in the world of software development and administration. Read more.
