
Trying to delete a file or folder using PowerShell’s Remove-Item command, only to see the “Access to the path is denied” error, can be incredibly frustrating. In many cases, the command itself is perfectly correct, but PowerShell still refuses to remove the item.
This error usually happens because of permission restrictions, locked files, hidden system protection, or PowerShell not running with elevated privileges. The good news is that the problem is completely fixable once you identify the actual cause.
In this tutorial, I’ll show you the most common reasons behind the “Access to the path is denied” error in PowerShell and walk you through step-by-step solutions to fix it. Whether you’re deleting files, folders, logs, or protected directories, these methods will help you resolve the issue quickly.
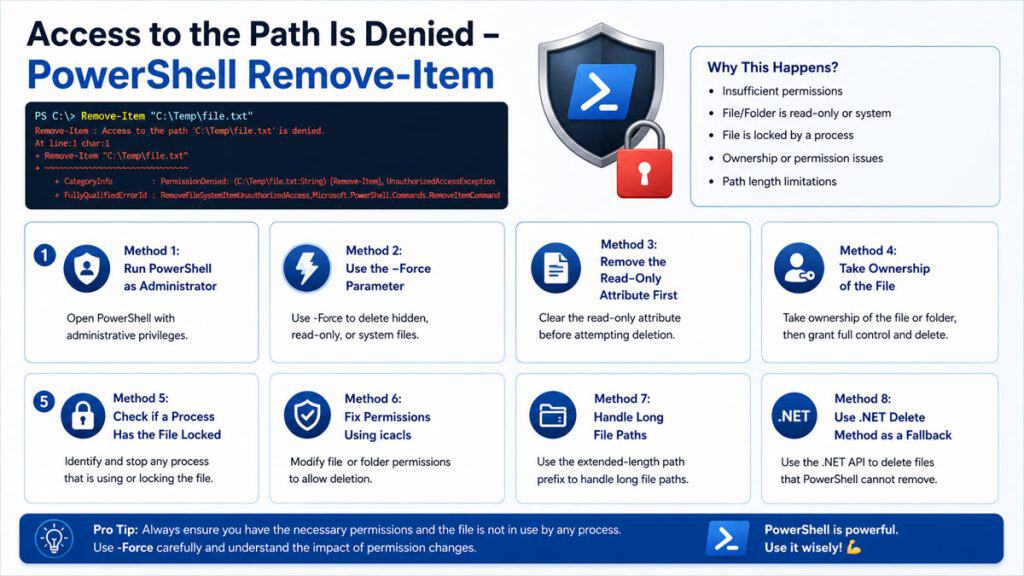
What This Error Actually Means
Before jumping to the fixes, it helps to understand why PowerShell throws this error. The message “Access to the path is denied” is Windows telling you that the current user account running PowerShell doesn’t have the right permissions to delete that file or folder.
But here’s the thing — “permissions” can mean several different things:
- You’re not running PowerShell as an Administrator
- Another process has the file locked and open
- The file has the Read-Only attribute set
- You don’t own the file
- The path is too long (yes, Windows has a 260-character limit)
Each one of these has its own fix, so let’s go through them one by one.
Method 1: Run PowerShell as Administrator
This is the first thing you should try, and it fixes the problem about 80% of the time.
By default, PowerShell opens without elevated privileges. That means even if your Windows account is an administrator, PowerShell itself isn’t running with admin rights unless you specifically launch it that way.
Here’s how to do it:
- Press the Windows key, type PowerShell
- Right-click on Windows PowerShell in the results
- Click Run as administrator
- Click Yes if the UAC prompt appears
Now try your command again:
Remove-Item -Path "C:\SomeFolder\file.txt"
A lot of the time, that’s all it takes.
Pro tip: If you’re running a script and you always need admin rights, add this to the very top of your .ps1 file:
#Requires -RunAsAdministrator
This makes PowerShell show an error immediately if someone tries to run the script without admin rights, instead of failing halfway through.
Check out PowerShell Remove-Item Cmdlet
Method 2: Use the -Force Parameter
Sometimes the issue isn’t about admin rights — it’s about the file having a special attribute like Read-Only or Hidden. PowerShell respects those attributes by default and won’t delete files with them unless you tell it to push through.
That’s what -Force does. It overrides those protections.
Remove-Item -Path "C:\SomeFolder\file.txt" -Force
If you’re deleting a folder that has contents inside it, combine -Force with -Recurse:
Remove-Item -Path "C:\SomeFolder" -Recurse -Force
The -Recurse flag tells PowerShell to go into subfolders and delete everything inside before removing the folder itself.
A word of caution: -Force is powerful. It won’t ask for confirmation, and it won’t send things to the Recycle Bin. Once it’s gone, it’s gone. Use it deliberately, not as a catch-all habit.
Read PowerShell Output to File and Console
Method 3: Remove the Read-Only Attribute First
If the file is specifically marked as Read-Only, -Force usually handles it. But sometimes you might want to clear that attribute manually — especially before doing batch deletions across a folder.
You can do this with the attrib command directly inside PowerShell:
attrib -R "C:\SomeFolder\report.docx"
Or you can use Set-ItemProperty the PowerShell-native way:
Set-ItemProperty -Path "C:\SomeFolder\report.docx" -Name IsReadOnly -Value $false
After that, your Remove-Item should work without issues:
Remove-Item -Path "C:\SomeFolder\report.docx"
If you’re dealing with an entire folder full of read-only files, handle them all at once:
Get-ChildItem -Path "C:\SomeFolder" -Recurse | ForEach-Object {
    $_.IsReadOnly = $false
}
Remove-Item -Path "C:\SomeFolder" -Recurse -Force
This loops through every file inside the folder, clears the Read-Only flag, and then deletes the whole thing.
Check out How to Move Files from One Folder to Another Using PowerShell
Method 4: Take Ownership of the File
This one is for trickier situations — like when the file was created by a different user account, a system process, or a piece of software that set itself as the file owner. Even as an admin, you can be blocked if you don’t own the file.
The fix is the takeown command, which reassigns ownership of the file to you:
takeown /f "C:\SomeFolder\lockedfile.txt"
After taking ownership, grant your account full control using icacls:
icacls "C:\SomeFolder\lockedfile.txt" /grant "$env:USERNAME:F"
Now run Remove-Item:
Remove-Item -Path "C:\SomeFolder\lockedfile.txt" -Force
The $env:USERNAME bit automatically uses your current Windows username, so you don’t have to hard-code it. Handy if you’re writing a reusable script.
For a folder and everything inside it:
takeown /f "C:\SomeFolder" /r /d y
icacls "C:\SomeFolder" /grant "$env:USERNAME:F" /t
Remove-Item -Path "C:\SomeFolder" -Recurse -Force
The /r flag on takeown applies recursively, and /t on icacls does the same.
Read Check if a File’s LastWriteTime is Greater Than a Specific Date in PowerShell
Method 5: Check if a Process Has the File Locked
Here’s a frustrating one. Sometimes the file permissions are completely fine, but another application — maybe a browser, a service, or another script — has the file open and locked. PowerShell can’t delete a file that’s actively being used by another process.
How to find what’s locking the file:
Open Resource Monitor (type resmon in the Run dialog or search for it in Start). Go to the CPU tab and look for the Associated Handles section. Search for the filename there and you’ll see which process has it open.
Alternatively, use Process Explorer from Sysinternals — press Ctrl+F and search for the file name.
Once you find the process:
- If it’s something like a browser or editor, just close that application
- If it’s a service, stop it temporarily from Services (
services.msc) or from PowerShell:
Stop-Service -Name "ServiceName" -Force
Then delete the file and restart the service if needed:
Remove-Item -Path "C:\SomeFolder\lockedfile.log" -Force
Start-Service -Name "ServiceName"
Check out Find the Process Locking a File Using PowerShell
Method 6: Fix Permissions Using icacls
Sometimes the issue is specifically the Access Control List (ACL) on the file or folder. The ACL is basically a list of rules that says who can read, write, or delete something.
If your user account isn’t on that list with the right permissions, you’ll get the access denied error even as an admin.
Here’s how to grant your account full control with icacls:
icacls "C:\SomeFolder" /grant "$env:USERNAME:(OI)(CI)F" /t
Breaking that down:
(OI)— Object Inherit (applies to files inside)(CI)— Container Inherit (applies to subfolders)F— Full control/t— Apply recursively to all subfolders and files
After running that, try Remove-Item again.
You can also do this through the GUI if you prefer:
- Right-click the folder → Properties → Security tab
- Click Edit → Add
- Type your username → Click Check Names → OK
- Check Full control → Apply → OK
Read PowerShell Find File by Name Wildcard Examples
Method 7: Handle Long File Paths
Windows has a maximum path length of 260 characters. If your folder is buried deep in nested subfolders with long names, the path can exceed that limit and PowerShell will throw an access denied error — even though it’s really a path-length problem in disguise.
The fix is to use the \\?\ prefix, which tells Windows to bypass that 260-character restriction:
Remove-Item -LiteralPath "\\?\C:\Really\Long\Nested\Path\To\File\file.txt" -Force
Note that you need to use -LiteralPath instead of -Path here. -LiteralPath treats the path as a literal string and doesn’t interpret wildcard characters, which is required for the \\?\ syntax to work correctly.
Alternatively, you can enable long path support system-wide in Windows 10/11:
- Open Group Policy Editor (
gpedit.msc) - Navigate to Local Computer Policy → Computer Configuration → Administrative Templates → System → Filesystem
- Enable Enable Win32 long paths
Check out How to Extract Directory from File Path in PowerShell?
Method 8: Use .NET Delete Method as a Fallback
If nothing else works, you can bypass Remove-Item entirely and use the underlying .NET System.IO classes to delete the file. This sometimes gets around restrictions that the PowerShell cmdlet runs into.
For a file:
[System.IO.File]::Delete("C:\SomeFolder\stubborn-file.txt")For a directory:
[System.IO.Directory]::Delete("C:\SomeFolder", $true)The $true parameter on Directory::Delete means “delete recursively.” This is the equivalent of Remove-Item -Recurse.
This approach is useful when you’re dealing with edge cases like symbolic links or junction points that confuse PowerShell’s native cmdlet.
Handle Errors Gracefully in PowerShell Scripts
If you’re writing a script that deletes files and you want it to keep running even when it hits a file it can’t delete (instead of crashing), use -ErrorAction:
Remove-Item -Path "C:\SomeFolder\file.txt" -Force -ErrorAction SilentlyContinue
SilentlyContinue suppresses the error and moves on. If you want to log those errors instead of ignoring them silently:
Remove-Item -Path "C:\SomeFolder\file.txt" -Force -ErrorAction Continue 2>> "C:\Logs\errors.log"
Or capture it with a try/catch block:
try {
    Remove-Item -Path "C:\SomeFolder\file.txt" -Force -ErrorAction Stop
    Write-Host "File deleted successfully."
}
catch {
    Write-Host "Could not delete file: $_"
}
Using -ErrorAction Stop inside a try/catch is the cleanest way to handle this in production scripts because it gives you full control over what happens when deletion fails.
Quick Troubleshooting Checklist
When you get “Access to the path is denied,” run through this list in order:
- Are you running PowerShell as Administrator? That’s step one, always.
- Is the file Read-Only? Use
-Forceor clear the attribute manually. - Does another app have it open? Check Resource Monitor and close the locking process.
- Do you own the file? Run
takeownto reclaim ownership. - Is the ACL blocking you? Use
icaclsto grant yourself full control. - Is the path over 260 characters? Use the
\\?\prefix with-LiteralPath. - Still nothing? Try the .NET
System.IOdelete method.
Work through these in order, and you’ll find the fix.
The “Access to the path is denied” error in PowerShell is rarely a dead end. In most cases, it’s just Windows being careful — and once you know which layer of protection is causing the block, the fix is straightforward. Start by running as Administrator, and if that doesn’t work, work through the methods above one by one.
You may also like the following tutorials:

Bijay Kumar is an esteemed author and the mind behind PowerShellFAQs.com, where he shares his extensive knowledge and expertise in PowerShell, with a particular focus on SharePoint projects. Recognized for his contributions to the tech community, Bijay has been honored with the prestigious Microsoft MVP award. With over 15 years of experience in the software industry, he has a rich professional background, having worked with industry giants such as HP and TCS. His insights and guidance have made him a respected figure in the world of software development and administration. Read more.
