When working with files and folders in PowerShell, the Remove-Item cmdlet is one of the most commonly used commands for deleting items. While it works well in straightforward scenarios, things don’t always go as planned. A file might be locked by another process, you may not have sufficient permissions, or the specified path may not exist. In such cases, your script can stop unexpectedly if errors aren’t handled properly.
This is where PowerShell’s Try...Catch statement becomes invaluable. By combining Remove-Item with Try...Catch, you can gracefully handle errors, display meaningful messages, log failures, or continue executing the rest of your script without interruption.
In this tutorial, you’ll learn how to use Remove-Item with Try Catch properly in PowerShell with some real examples.
Let’s get into it.
What Is Remove-Item in PowerShell?
Remove-Item is the PowerShell cmdlet you use to delete files, folders, registry keys, and more. It’s the PowerShell equivalent of hitting the Delete key — or more accurately, Shift + Delete, because there’s no Recycle Bin involved.
Basic syntax looks like this:
Remove-Item -Path "C:\Temp\oldfile.txt"
It’s simple and works well in most cases. But the moment something goes wrong — the file doesn’t exist, it’s locked by another process, or you don’t have permission — that’s when things get messy.
Check out PowerShell Script to Delete Files Older Than 30 Days
Why You Need Try Catch with Remove-Item
Here’s the thing most beginners miss: Remove-Item does not throw a terminating error by default.
Let me explain what that means in plain English.
In PowerShell, errors come in two types:
- Terminating errors — These stop the script cold and can be caught with
Try Catch. - Non-terminating errors — These are logged, a message is shown, but the script keeps running.
Try Catchcompletely ignores them.
By default, Remove-Item throws a non-terminating error. So if you wrap it in a Try Catch block without any changes, the Catch block will never run. This trips up a lot of people, and it’s the number one reason I see broken error handling in PowerShell scripts.
Here’s the fix: you need to add -ErrorAction Stop to Remove-Item. This tells PowerShell to treat any error from that command as a terminating error — which means Try Catch can actually catch it.
The Basic Try Catch Structure in PowerShell
Before jumping into Remove-Item specifically, let’s quickly look at how Try Catch works in PowerShell.
try {
    # Code that might fail
}
catch {
    # What to do if it fails
}
finally {
    # Optional: This always runs, whether or not there was an error
}- The
tryblock runs your code. - If something goes wrong (and it’s a terminating error), execution jumps to the
catchblock. - The
finallyblock runs no matter what — error or not.
Inside the catch block, you can access error details using $_. For example, $_.Exception.Message gives you the human-readable error message.
Check out How To Delete File If Exists In PowerShell?
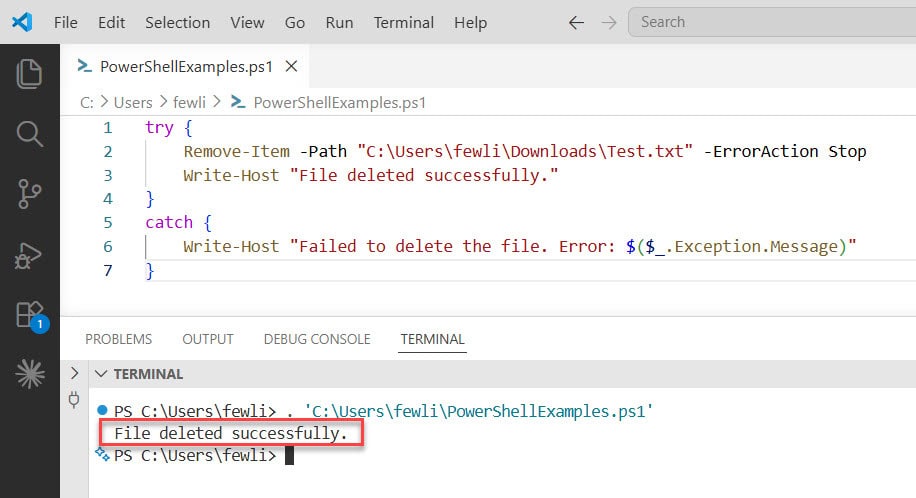
Method 1: Basic Remove-Item with Try Catch
This is your starting point. Always use -ErrorAction Stop so the Catch block actually fires.
try {
    Remove-Item -Path "C:\Users\fewli\Downloads\Test.txt" -ErrorAction Stop
    Write-Host "File deleted successfully."
}
catch {
    Write-Host "Failed to delete the file. Error: $($_.Exception.Message)"
}
If the file exists and you have permission, you’ll see:
File deleted successfully.
You can see the exact output in the screenshot below:
If the file doesn’t exist or there’s a permissions issue, you’ll see something like:
Failed to delete the file. Error: Cannot find path 'C:\Temp\oldfile.txt' because it does not exist.
Clean, clear, and useful. This alone is miles better than letting your script crash without context.
Check out How to Delete a File in PowerShell?
Method 2: Check if the File Exists First with Test-Path
Sometimes the simplest approach is the best one. Before trying to delete a file, just check if it exists using Test-Path. If it doesn’t exist, don’t even try to delete it.
$filePath = "C:\Temp\oldfile.txt"

if (Test-Path $filePath) {
    try {
        Remove-Item -Path $filePath -ErrorAction Stop
        Write-Host "Deleted: $filePath"
    }
    catch {
        Write-Host "Error deleting $filePath : $($_.Exception.Message)"
    }
}
else {
    Write-Host "File not found: $filePath"
}
This is great for situations where the file may or may not exist, and both outcomes are valid. You’re not treating a missing file as an error — you’re just handling it differently.
One thing to keep in mind: there’s a tiny race condition possible here. Technically, a file could be deleted between when Test-Path checks and when Remove-Item runs.
In most real-world scripts this isn’t a concern, but it’s good to know. That’s why combining Test-Path with Try Catch (like the example above) is the safest approach.
Method 3: Deleting Multiple Files with a Loop
What if you need to delete a whole list of files? Maybe you have a text file with paths, or you’re cleaning up a folder. The trick here is to loop through each file individually and handle errors per file — not all at once.
Here’s an example where you’re reading file paths from a text file and deleting each one:
$fileList = Get-Content "C:\Cleanup\files_to_delete.txt"

foreach ($file in $fileList) {
    try {
        Remove-Item -Path $file -ErrorAction Stop
        Write-Host "Deleted: $file"
    }
    catch {
        Write-Host "Could not delete '$file': $($_.Exception.Message)"
    }
}
Each file gets its own Try Catch, so if one fails (maybe it’s locked or missing), the loop continues to the next one. You don’t lose the whole batch just because one file had an issue.
You can also log the results to a file by piping the output:
$fileList = Get-Content "C:\Cleanup\files_to_delete.txt"
$logPath = "C:\Cleanup\deletion_log.txt"

foreach ($file in $fileList) {
    try {
        Remove-Item -Path $file -ErrorAction Stop
        "Deleted: $file" | Out-File -Append $logPath
    }
    catch {
        "Failed: $file — $($_.Exception.Message)" | Out-File -Append $logPath
    }
}
Now you’ve got a clean log showing exactly what happened to each file. Super useful when you’re running cleanup scripts on servers and need to audit the results later.
Method 4: Deleting a Folder (Including Everything Inside It)
Deleting a folder and all its contents is a common task. You use -Recurse to remove everything inside, and -Force to suppress prompts and push through read-only files.
$folderPath = "C:\Temp\OldBackups"

try {
    Remove-Item -Path $folderPath -Recurse -Force -ErrorAction Stop
    Write-Host "Folder deleted: $folderPath"
}
catch {
    Write-Host "Failed to delete folder: $($_.Exception.Message)"
}
A few things to watch out for here:
- If any file in the folder is open or locked by another process,
Remove-Itemwill fail. -Forceremoves read-only files, but it won’t force-close file locks held by running processes.- If you’re deleting a folder with many nested files and one fails, the whole operation errors out.
If you need granular control over which files get deleted inside a folder, loop through them individually with Get-ChildItem (more on this below).
Method 5: Deleting Files in a Folder One by One
When you use Remove-Item -Recurse and one file fails, the whole command can error out. If you want to delete files one by one and handle each failure separately, combine Get-ChildItem with a foreach loop:
$folderPath = "C:\Temp\OldLogs"

Get-ChildItem -Path $folderPath -File | ForEach-Object {
    try {
        Remove-Item -Path $_.FullName -ErrorAction Stop
        Write-Host "Deleted: $($_.FullName)"
    }
    catch {
        Write-Host "Could not delete $($_.Name): $($_.Exception.Message)"
    }
}
This gives you full control. If a file is locked, you know exactly which one it is and your script continues deleting the rest. Much better than watching a recursive delete fail halfway through and not knowing what happened.
Method 6: Catching Specific Exception Types
Sometimes you want to handle different errors differently. For example, maybe a “file not found” error should just be logged quietly, but an “access denied” error should send an alert or stop the script entirely.
You can catch specific exception types in PowerShell like this:
$filePath = "C:\Temp\report.txt"

try {
    Remove-Item -Path $filePath -ErrorAction Stop
    Write-Host "File deleted."
}
catch [System.UnauthorizedAccessException] {
    Write-Warning "Access denied. You don't have permission to delete this file."
}
catch [System.IO.FileNotFoundException] {
    Write-Warning "File not found — maybe it was already deleted."
}
catch {
    Write-Host "Unexpected error: $($_.Exception.Message)"
}
The last catch block (without a specific exception type) acts as a catch-all. Any error that doesn’t match the specific types above will land here.
To find out what exception type an error is, you can run this after an error occurs:
$Error[0].Exception.GetType().FullName
That’ll give you the full name of the exception, which you can then use in your specific catch blocks.
Method 7: Using the Finally Block for Cleanup
The finally block runs after the try and catch, no matter what happened. This is useful when you need to clean something up after an operation — like closing a log file, releasing a lock, or resetting a variable.
Here’s a practical example:
$tempFile = "C:\Temp\process_output.txt"

try {
    # Do some work that creates a temp file
    "Processing done." | Out-File $tempFile
    # Simulate an error
    Remove-Item -Path "C:\Temp\nonexistent.txt" -ErrorAction Stop
}
catch {
    Write-Host "Error occurred: $($_.Exception.Message)"
}
finally {
    if (Test-Path $tempFile) {
        Remove-Item -Path $tempFile -ErrorAction SilentlyContinue
        Write-Host "Temporary file cleaned up."
    }
}
Notice I used -ErrorAction SilentlyContinue inside the finally block. Since I’m already in cleanup mode, I don’t want the finally block itself to throw an error. If the temp file doesn’t exist, I just want to move on silently.
Using $ErrorActionPreference for Global Settings
If you’re writing a longer script and want every command to behave like it has -ErrorAction Stop, you can set this at the top:
$ErrorActionPreference = "Stop"
After this line, any error in your script will be treated as terminating, so your Try Catch blocks will work everywhere without adding -ErrorAction Stop to every single line.
Just be careful — this also applies to commands you might want to silently fail. If a command fails and there’s no Try Catch around it, your script will stop. Use this when you want strict error handling throughout and plan your error handling accordingly.
Using -ErrorVariable to Capture Errors
Another useful trick: the -ErrorVariable parameter. It lets you capture error information into a named variable instead of relying on $_ inside catch.
Remove-Item -Path "C:\Temp\file.txt" -ErrorAction SilentlyContinue -ErrorVariable deleteError

if ($deleteError) {
    Write-Host "Error: $($deleteError[0].Exception.Message)"
}
This approach is handy when you don’t want to use Try Catch but still want to check what went wrong after the fact. It’s also useful inside loops where you want to inspect errors after the loop finishes.
Common Mistakes to Avoid
Here are the mistakes I see most often when people use Remove-Item with error handling:
- Forgetting
-ErrorAction Stop— Without it,Catchnever runs. This is the single most common issue. - Using one
Remove-Itemfor many files without a loop — If you pass multiple paths and one fails, you lose granular error info. - Not checking file existence before deleting — Combine
Test-PathwithTry Catchfor the most robust approach. - Catching errors but doing nothing — An empty
catchblock is almost as bad as no error handling. At minimum, log the error. - Using
-Forcewithout understanding what it does —-Forcebypasses read-only attributes but does not unlock files held open by processes.
Quick Reference
Here’s a summary of the key pieces you’ll use most:
Remove-Item -Path "path" -ErrorAction Stop— Makes the error catchabletry { } catch { }— Wrap your delete operation$_.Exception.Message— Get the error message inside catchTest-Path— Check if a file exists before deleting-Recurse -Force— Delete folders and their contents$ErrorActionPreference = "Stop"— Make all errors terminating globally-ErrorVariable myVar— Capture errors into a named variablefinally { }— Run cleanup code no matter what
A Real-World Script Putting It All Together
Here’s a complete script that reads a list of files to delete from a text file, deletes each one with proper error handling, and writes a log:
$ErrorActionPreference = "Stop"

$inputFile  = "C:\Cleanup\files_to_remove.txt"
$logFile    = "C:\Cleanup\deletion_log_$(Get-Date -Format 'yyyyMMdd_HHmmss').txt"

if (-not (Test-Path $inputFile)) {
    Write-Host "Input file not found: $inputFile"
    exit
}

$files = Get-Content $inputFile

foreach ($file in $files) {
    if (Test-Path $file) {
        try {
            Remove-Item -Path $file -Force -ErrorAction Stop
            $msg = "[SUCCESS] Deleted: $file"
        }
        catch {
            $msg = "[FAILED]  Could not delete '$file': $($_.Exception.Message)"
        }
    }
    else {
        $msg = "[SKIPPED] File not found: $file"
    }

    Write-Host $msg
    $msg | Out-File -Append $logFile
}

Write-Host "`nLog saved to: $logFile"
This script is safe, clear, and logs everything. You can run it on a schedule, hand it to a colleague, or drop it into a maintenance routine with confidence.
Wrapping Up
Error handling in PowerShell isn’t complicated once you understand the terminating vs non-terminating error distinction. The key takeaway is simple: always add -ErrorAction Stop when using Remove-Item inside a Try Catch block, otherwise your error handling won’t work at all.
From there, it’s about choosing the right pattern for your situation — a basic try/catch for single files, a loop for multiple files, specific exception catches for different failure types, and a finally block when you need guaranteed cleanup.
You may also like:
- Check if a File’s LastWriteTime is Greater Than a Specific Date in PowerShell
- PowerShell Get-ChildItem Files Only
- How to Test If a File Exists in PowerShell?
Bijay Kumar is an esteemed author and the mind behind PowerShellFAQs.com, where he shares his extensive knowledge and expertise in PowerShell, with a particular focus on SharePoint projects. Recognized for his contributions to the tech community, Bijay has been honored with the prestigious Microsoft MVP award. With over 15 years of experience in the software industry, he has a rich professional background, having worked with industry giants such as HP and TCS. His insights and guidance have made him a respected figure in the world of software development and administration. Read more.
