
To convert a CER file to PEM in PowerShell 7, load it as an X509Certificate2 and call ExportCertificatePem(). In Windows PowerShell 5.1, Base64-encode the bytes and wrap them in BEGIN and END CERTIFICATE lines yourself:
$cert = [System.Security.Cryptography.X509Certificates.X509Certificate2]::new('C:\Certs\shop.cer')
$cert.ExportCertificatePem() | Set-Content -Path C:\Certs\shop.pem
Linux servers, NGINX, Apache and most cloud consoles want PEM, while Windows usually exports .cer files. Below I check which kind of .cer you have, convert it in both PowerShell versions and with certutil, and verify the result.
For testing, I created throwaway self-signed certificates in memory, so nothing was added to the Windows certificate store.
Check what kind of .cer file you have
A .cer file can be binary DER or Base64 text. A Base64 .cer that starts with —–BEGIN CERTIFICATE—– is already PEM, and you only need to rename it. DER files start with the byte 0x30:
foreach ($file in Get-ChildItem -Path .\Certs -Filter *.cer -Recurse) {
    $b = [System.IO.File]::ReadAllBytes($file.FullName)
    $kind = if ($b[0] -eq 0x30) { 'DER (binary)' }
            elseif ([System.Text.Encoding]::ASCII.GetString($b, 0, 10) -eq '-----BEGIN') { 'Base64 (already PEM)' }
            else { 'Unknown' }
    '{0,-9} {1}' -f $file.Name, $kind
}
Output:
shop.cer  DER (binary)
api.cer   DER (binary)
vpn.cer   DER (binary)
All three test files are DER, which is what Windows exports by default. To create a test certificate of your own, see creating a self-signed certificate.
Convert with ExportCertificatePem in PowerShell 7
PowerShell 7 runs on modern .NET, which can write PEM directly:
$path = (Resolve-Path -Path .\Certs\shop.cer).Path
$cert = [System.Security.Cryptography.X509Certificates.X509Certificate2]::new($path)
$cert.ExportCertificatePem() | Set-Content -Path .\Certs\shop.pem

$pem = Get-Content -Path .\Certs\shop.pem
$pem[0]
"$($pem[1].Substring(0, 20))...  ($($pem[1].Length) characters per line)"
$pem[-1]
Output:
-----BEGIN CERTIFICATE-----
MIICtzCCAZ+gAwIBAgIJ...  (64 characters per line)
-----END CERTIFICATE-----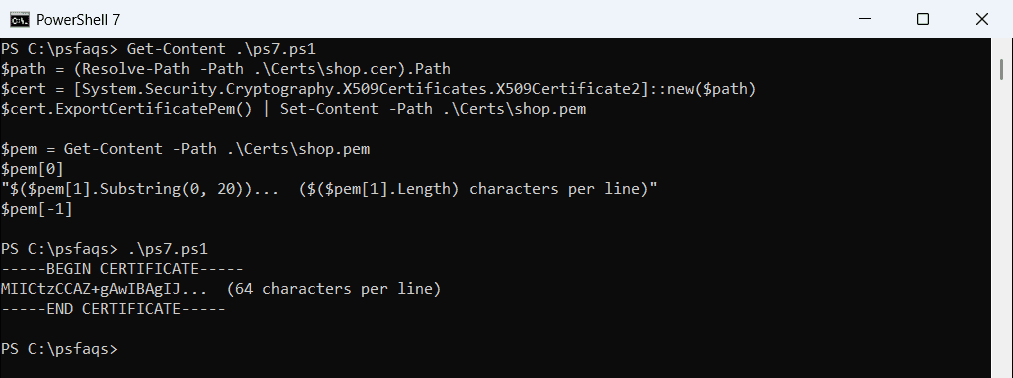
Use a full path when you create the X509Certificate2 object, because .NET doesn’t follow PowerShell’s current folder. To build one, see getting the full path of a file.
ExportCertificatePem isn’t in Windows PowerShell 5.1
The method was added in .NET 7, so 5.1 can’t find it:
$path = (Resolve-Path -Path .\Certs\shop.cer).Path
$cert = [System.Security.Cryptography.X509Certificates.X509Certificate2]::new($path)
try   { $null = $cert.ExportCertificatePem(); 'ExportCertificatePem worked' }
catch { "Failed. $($_.Exception.Message)" }
Output:
ExportCertificatePem workedThe output above is from PowerShell 7. In Windows PowerShell 5.1, the same call fails with Method invocation failed, because the X509Certificate2 type has no method named ExportCertificatePem.
Convert CER to PEM in Windows PowerShell 5.1
A PEM certificate is just the Base64 of the DER bytes, split into 64-character lines, between two marker lines. This function builds that and works in both versions:
function ConvertTo-Pem ([string]$CerPath, [string]$PemPath) {
    $bytes  = [System.IO.File]::ReadAllBytes((Resolve-Path -Path $CerPath).Path)
    $base64 = [System.Convert]::ToBase64String($bytes)
    $lines  = [regex]::Matches($base64, '.{1,64}') | ForEach-Object { $_.Value }
    $pem    = @('-----BEGIN CERTIFICATE-----') + $lines + '-----END CERTIFICATE-----'
    Set-Content -Path $PemPath -Value $pem -Encoding ascii
}
I saved it as ConvertTo-Pem.ps1 and dot-source it below:
. .\ConvertTo-Pem.ps1
ConvertTo-Pem -CerPath .\Certs\shop.cer -PemPath .\Certs\shop.pem

$pem = Get-Content -Path .\Certs\shop.pem
"First line:  $($pem[0])"
"Line length: $($pem[1].Length)"
"Last line:   $($pem[-1])"
$bytes = [System.IO.File]::ReadAllBytes((Resolve-Path -Path .\Certs\shop.cer).Path)
$wrapped = [System.Convert]::ToBase64String($bytes, 'InsertLineBreaks')
"InsertLineBreaks would give: $(($wrapped -split "`r`n")[0].Length)"
Output:
First line:  -----BEGIN CERTIFICATE-----
Line length: 64
Last line:   -----END CERTIFICATE-----
InsertLineBreaks would give: 76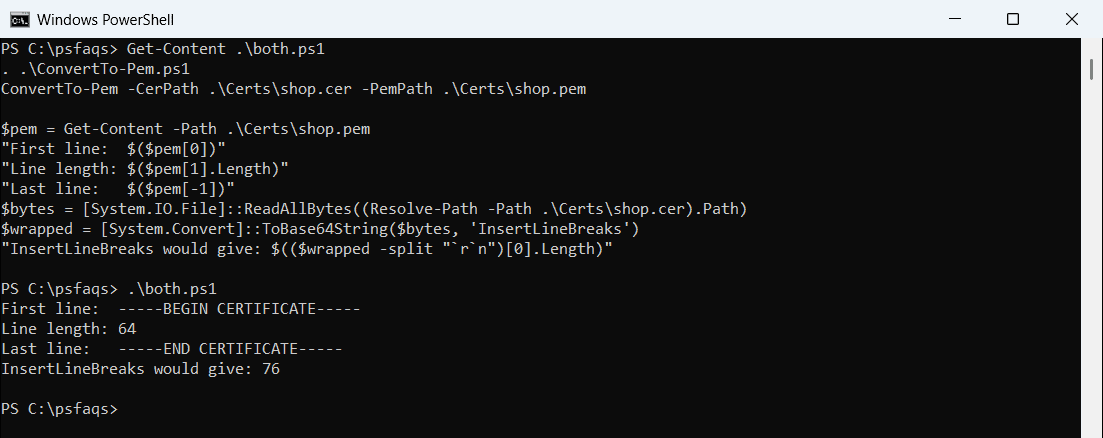
Don’t use the InsertLineBreaks option of ToBase64String here. It wraps at 76 characters, which some strict PEM parsers reject. More on Base64 is in converting files to Base64.
Convert with certutil
Windows also has certutil.exe, which runs from either PowerShell version. -encode writes a PEM file, and -f overwrites an existing one:
certutil.exe -f -encode .\Certs\shop.cer .\Certs\shop-certutil.pem | Select-Object -Last 1
$pem = Get-Content -Path .\Certs\shop-certutil.pem
"$($pem[0]) / $($pem[1].Length) characters per line / $($pem[-1])"
Output:
CertUtil: -encode command completed successfully.
-----BEGIN CERTIFICATE----- / 64 characters per line / -----END CERTIFICATE-----
It’s the quickest choice for a single file. The PowerShell function is easier to use in scripts, because you don’t have to read the certutil output to see what happened.
Check the PEM file
Load the PEM back into a certificate object and compare its thumbprint with the original. If anything went wrong in the conversion, the thumbprints won’t match:
. .\ConvertTo-Pem.ps1
ConvertTo-Pem -CerPath .\Certs\shop.cer -PemPath .\Certs\shop.pem

$X509 = [System.Security.Cryptography.X509Certificates.X509Certificate2]
$original = $X509::new((Resolve-Path -Path .\Certs\shop.cer).Path)
$body = (Get-Content -Path .\Certs\shop.pem | Where-Object { $_ -notmatch '^-----' }) -join ''
$fromPem = $X509::new([System.Convert]::FromBase64String($body))

"Subject:          $($fromPem.Subject)"
"Valid until:      $($fromPem.NotAfter.ToString('yyyy-MM-dd'))"
"Same thumbprint:  $($fromPem.Thumbprint -eq $original.Thumbprint)"
Output:
Subject:          CN=shop.contoso.com
Valid until:      2027-10-01
Same thumbprint:  True